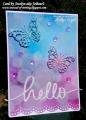
Did you see the SCS Tutorial on how to create a Watercolor Bokeh background? If not, you can read all about it and watch the video here: Watercolor Bokeh Tutorials at Splitcoaststampers I really love this technique and it was super-easy and fun to do. Why not give it a try today?! :-D
I used Ranger Distress Inks in Picked Raspberry and Salty Ocean for my background by smooshing my ink pads onto my Craft Creations non-stick Craft Mat, spraying the inks with water then lay the smooth side of my Ranger Distress watercolour cardstock on top. I let the cardstock sit in the inks for about 30 seconds then moved it around and lifted it up to check how the coverage was then kept dabbing the cardstock into the inks until I was happy with how it looked. I was too impatient to wait for my cardstock to air-dry so dried it off using my heat-gun.
I made a stencil of various sizes of circles using clear acetate and my Lifestyle Nesting Circle dies then used a finger dauber to pounce Hero Arts white dye ink circles all over my background using the stencil. At first my background looked pretty ordinary and I wondered whether it was going to look any good but the more circles that I added and the more that I overlapped, the better it started to look. I also went over some of the circles to make them brighter than others which really helped the effect look more realistic. The white circles on the blue part of my card don't show up quite as well in the photo compared to real life.
The decorative edge was made with all-time favourite edge punch: Martha Stewart Lace Doily. I attached the panel to white cardstock using Stampin' Up Fuse Fast adhesive then used my Perfect Layers Tools to trim the cardstock to 1/16".
I sponged two small pieces of Stampin' Up Dazzling Diamonds glimmer paper (which is sparkly white and as thick as cardstock) with the same Distress Inks that I used for my background then diecut them using my Big Shot and a Memory Box Pippi Butterfly die. I was a bit concerned that the colour might transfer to my butterfly die so I very carefully ran my heat-gun over the glitter paper before diecutting to make sure it was dry. I attached just the centres of the butterflies using Tombow Mono Multi glue.
The 'Hello' is a die from Mama Elephant and was diecut from the same glimmer paper and glued on using Tombow Mono Multi glue. I rounded the corners on the bottom using the 1/8" size on my We R Memory Keepers Corner Chomper. Lastly, I glued on some iridescent sequins using Ranger Multi Medium Matte which is a strong adhesive and dries clear. The card is a top folding card.
This card will be going to my Mum just to brighten her day. Mum's last remaining sibling passed away several weeks ago so it has been a difficult time for her.
Splitcoast Dirty Dozen Alumni SCS Gallery Moderator Splitcoast Challenge Hostess Teapot Tuesday TEAm
Registered: July 27, 2007 Location: Dublin, Ireland Posts: 132039
Mon, May 11, 2015 @ 8:02 AM
I really love the way you used the two colours to create the background and then picked them up with the pair of butterflies. The sequins look really great here too.
Registered: September 22, 2008 Location: Clinton, OH Posts: 254
Tue, May 12, 2015 @ 9:44 AM
VERY pretty! I just learned this technique at a rubber stamping convention I attended. The demo used this method to make it look like bubbles underwater with a fish on the card. Thanks for sharing.