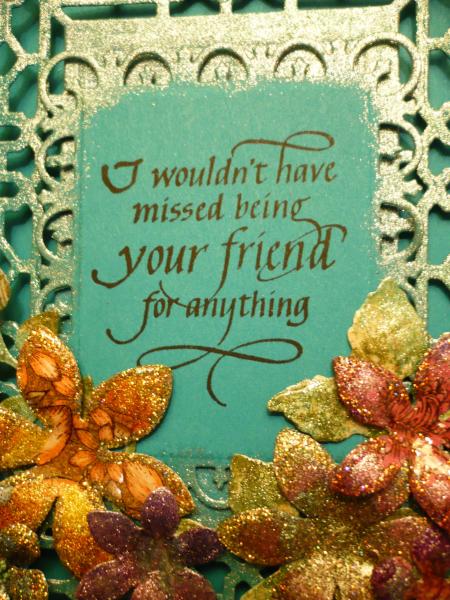
This is the close-up view of the front of the card, I hope you can see more of the gleam and glitter on the flowers, as well as the various patterns and the bright colors.
This was a card that I likely made faster than any other card, I had been ill for several days then was going to meet with a dear friend and say goodbye to her, knowing it likely would be a very long time until we meet again, as she was moving away. When I realized that I had about 2 hours to make a card and matching envelope (not pictured), take photos, and write a heartfelt note of appreciation and support to my friend--I knew I'd have to really move quickly.
How I admire all of you who can just whip up a card in a few minutes--I am in awe of your talent!!! I do see I am improving, hopefully I will continue to improve in this area!
Fortunately I had already created the die-cut flowers (I made them in 2 batches made within days of each other, my first time making flowers like this, and absolutely LOVE these Heartfelt Creations floral dies and their patterned paper collections)--for more information on how I created them, please go back to the three cards I created and uploaded in June/July, 2014 using Heartfelt Creations supplies to make the flowers and the cards in general.
I recently acquired the Anna Griffin Fretworks Dies collection, and oh my goodness, I LOVE it!!! When I saw this die set on Anna's blog, I was mesmerized and determined I would find this set! As it turned out, it was only available on HSN, and I had to get someone in the US to buy it for me, as HSN will not sell to anyone without a US credit card and matching US billing address, hmmm... I have become a HUGE Anna Griffin fan, and LOVE what she brings to HSN a few times a year. I have been able to buy a few things on Ebay and others with the kind assistance of a kind American friend. When I received this Fretworks set, I immediately die-cut the frame die in a couple of colors. Then I took each frame and sponged the entire surface using the color of 3D Stamp Paint that was closest to that color (in this case, it was Lime Green--the color doesn't look like Lime Green to me. Unfortunately there are only 10 shimmery colors of 3D Stamp paint and 2 matte colors of black and white), and when it was dry, I took glossy accents and went over the intricate outline of the edge of the frame with glossy accents, and let it dry. This was already done when I started this card--and it was my focus for inspiration for this card.
PLEASE NOTE THAT THE 3D STAMP PAINT THAT I SPONGED ONTO THE EDGES OF THE DIES WAS NOT SILVER, BUT WAS VERY CLOSE TO THE TURQUOISE COLOR OF THE DIE-CUTS AND THE CARD-BASE. Somehow the photos that I took (at night) have turned out with this color of Stamp Paint is looking like a very heavy silver glitter paint--my apologies!!! I have much to learn about taking photos of cards, especially those that have some sort of glitter or shimmer on them, and MOST of my cards (except masculine cards) likely have some form of shimmer on them...
Because I wanted to have a tone-on-tone base with various dimensional and intricate die-cuts on top, I mounted the Fretworks frame die-cut with dimensionals and attached it to the turquoise card frame. Then I die-cut the Spellbinders Fleur de Lis Rectangles also made with also tempting turquoise card-stock, then stamped it with the Quietfire Designs stamp, "I Wouldn't Have Missed Being Your Friend".
Although I have known about the Canadian stamp company, Quietfire Designs in Vancouver, BC since I saw Becca Feeken of "Amazing Paper Grace" blog use these gorgeous stamps on her cards several years ago, I had only recently placed my first order there when there was a sale on, and this stamp was on my desk with the others that I had bought. This was the perfect stamp to convey how I felt about my friend, and I felt grateful that I had this stamp at this time to use now. Some of the older Quietfire Design stamps are unmounted (some have an option of being mounted or unmounted red rubber), but the newer stamps like this one come mounted, which I prefer. This stamp was fantastic, it stamped like a dream! I will definitely buy more, I have quite a long wish-list of Quietfire Design stamps.
Quietfire Design stamp company owner, Suzanne Cannon is a calligrapher, and she has created a line of stamps that is elegant, and I have not found anything like the sentiments that I have found here. The quality of these stamps is fantastic, you will be pleased when you try them. You will find a whole store full of quality card-making supplies that you won't find so easily elsewhere. If you are just buying stamps, the shipping price is unbelievably low in Canada ($3.50) and in the US ($6.99--these are prices as of today) for an unlimited number of stamps. And now, due to our falling Canadian dollar, prices for these Canadian stamps are at an even better price for Americans, for the prices at this store are based in Canadian funds that will be converted to the US equivalent. So what a deal for Americans right now!!!
I mounted this sentiment layer on thinner dimensionals, thinking that the card might be too thick otherwise, but once I'd placed it on the Fretworks frame layer, I was sorry that I hadn't used the thicker dimensionals that I had used to attach the Fretworks Frame to the card base. But it was too late, I didn't have any time to play around with it, and I was afraid I might damage the layer if I tried to pull it up and add thicker dimensionals. A lesson learned for another time.
Then from my stash of paper flowers and leaves I created using Heartfelt Creations dies, Heartfelt Creations paper collections, and various patterned paper from my stash--plus a whole list of a variety of other products (please see the card I made in June/July, 2014 using Heartfelt Creations stamps, dies, and paper collections for a more detailed description of how I made these flowers), I quickly layered them on the bottom of the card. I really didn't have time to play around with them as I would normally... As usual, I use my favorite glue for this task, Crafter's Pick The Ultimate glue, it is so strong and it dries clear. It's a thick glue, not one you'd want to use for tiny details or for intricate gluing, but for these paper flowers, it works the best of any glue I have tried. I am THRILLED that Hobby Lobby now carries The Ultimate glue, it's not found in the paper-crafting section of the store, it's in another section with other glues--but it's worth the look to find it, and it's very reasonably priced for a large bottle (plus you could use a HL coupon as I did when I bought it). I have not been able to find this glue at other larger craft stores like JoAnn (not even online, and JoAnn online is my go-to place to find crafting bargains), Michael's, or AC Moore--only at Hobby Lobby FYI. These flowers always stay securely on my cards, and the glue dries fairly quickly, I mounted them one by one... I hope that you can see the gleam and the glitter on these flowers--that is why I have included this close-up view.
Thank you so much for checking out my card, it means a great deal to me when you stop in and take a look at it! And when you leave a comment, it absolutely makes my day--thank you!!! I am encouraged by your comments, and it is my goal to learn from them and to grow and improve as a card-maker.
Please know how much I appreciate all that I learn from each of you when I view your beautiful cards--thank you for all that you teach me! How thankful I am for Splitcoaststampers, for all I have learned here and as well for the friends I have made since I started uploading my cards on this wonderful site!
Date: Friday, February 20, 2015 GMT Views: 2129
Favorited:2
Splitcoast Dirty Dozen Splitcoast Challenge Hostess Teapot Tuesday TEAm
Registered: January 19, 2014 Location: Central Indiana Posts: 89871
Thu, Mar 12, 2015 @ 4:56 PM
I am still in awe of these flowers. I keep coming back to them and am just WOWed. I still need to find the other element so that I can try to make these.