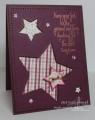
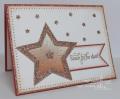
For my card today, I stamped a quote from "Reach for the Stars" in Versamark, heat embossed in copper onto the cardstock panel, then three of the ODBD Custom Sparkling Stars Dies were adhered with removable tape and cut out from the panel. Using the same dies, I cut the stars out of the Rustic Beauty Designer Paper Collection, plus made a 5-layer button for a simple embellishment. Learn how to make your own 5-layer buttons here. The four smallest stars were cut from the same paper and adhered onto the panel. The top panel was popped up with foam tape to give dimension to the cut outs.....the designer paper stars were adhered to the card base. Thanks so much for looking! Have a very blessed day!
Angie (or Angella with 2 L's)
******************************************
Designer for Our Daily Bread designs
Thanks for visiting My Blog
Date: Monday, November 3, 2014 GMT Views: 987
Favorited:4
Registered: February 3, 2005 Location: Delray Beach, FL Posts: 34769
Thu, Nov 06, 2014 @ 7:09 AM
Wow, Angie, I love the rich, dramatic color of this card. And the quote is wonderful! But the stars are fabulous with the DP showing through! Really love your design and the extra little "button" star with the gold cord!! Love it!! Hugs!
------------------------------ Cheryl
Proverbs 3:5-6 My blog
Registered: February 3, 2005 Location: Delray Beach, FL Posts: 34769
Thu, Nov 06, 2014 @ 7:11 AM
P. S. Thanks for the link to your tutorial, Angie! I just pinned that, and I will try it, because it really makes a big difference in appearance! Hugs!
------------------------------ Cheryl
Proverbs 3:5-6 My blog