I have emerged from my self-imposed exile, where I spent days upon days in my 'art studio' (aka 'junky space where I craft') meditating on my first projects as a member of the Dirty Dozen and what I could improve on.
HAHAHAHAHAHAHAHAHAHAHA
Oh, Lord...I barely got through that one without crying so hard the tears ran down my legs (TY, Susie, for teaching me that one!!)
I've been in the old craft room, yes. But ruminating? Meditating? Only if those words came to mean "Eating ho-ho's while doing some online shopping with the new credit card my DH has no clue exists." If that's the case, then by all means, yes...I was DEFINITELY 'meditating.'
The IC challenge was Vietri. My aunt Ruth owns a shop in Manteo (the Outer Banks) and has sold a few pieces here and there. I've loved this brand for a LONG time. Here's my inspiration piece http://www.vietri.com/natura-acorn-large-oval-platter.
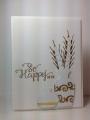
I took espresso paper and translucent embossing paste and a tree stencil and embossed the image on the brown paper. When it was dry, I covered it with 3 coats of acrylic white paint.
My original intent was to sand off the top of the embossing and let the brown peek through. Unfortunately, I learned too late that 3 coats of acrylic paint is a bit too much for my SU! sanding block to handle.
Never fear, though...remember that mama done bought herself a Dremel and that sucker not only has a sanding attachment, it's ELECTRIC!!!
Not ONLY did it make short work of sanding the top layer of paint off the embossed image, it ALSO does wonders on sanding down toenails, gel or acrylic nails and rough paper edges.
Ed. Note: While your paper edges will be smooth if you use the Dremel, there won't be much paper left after the fact. Not to mention the first 2 or 3 layers of skin on your fingers will join the scraps of paper fluff on the floor, as paper is a little too flimsy to be using a Dremel to sand it. If you do this then, like the author of this post, you deserve it for inventing crisis in which to justify your use of power tools. That is all.
At the end of it all, I tied a chocolate cotton (?) ribbon around it and ran a piece of copper through my big shot, over a leaf on the SU! Bigz die. I heated it with my heat gun (it would've been better had my DH approved my request for the acetylene torch I've been begging for, but it was not to be...at least for NOW-evil grin) and attached it with mounting tape.
I'm not sure how I pulled off 6-pretty intense-projects in less than 10 days, when it takes me 2 days to make a card and get it photographed for the IC challenge. But I AM trying to catch up as best I can, you can rest assured. Just be patient with me as I get my groove back.
Besides, you can only work so fast when one hand is constantly holding a ho-ho.
Date: Monday, October 20, 2014 GMT Views: 902
Favorited:3
Registered: April 1, 2012 Location: Rogers, AR Posts: 28962
Mon, Oct 20, 2014 @ 7:02 AM
It is a powerful card - and so is your writing ability! You need to pursue both -- great card love it!
------------------------------ Jan 'Being confident of this very thing, that he which hath begun a good work in you will perform it until the day of Jesus Christ'. Philippians 1:6
Registered: March 31, 2008 Location: Eastlake, OH Posts: 22598
Mon, Oct 20, 2014 @ 7:17 AM
This is wonderful Carmen! Your background looks fantastic with the sanded layers of white paint. I can relate to the use of power tools! There needs to be more power tools just for stamping! Love the copper leaf too and thanks for the morning chuckles! I'm rolling with laughter at that Dremel which I own but someone who lives here confiscated it for himself!
Splitcoast Dirty Dozen Alumni Creative Crew SU Design Team Alumni
Registered: October 5, 2006 Location: Maryland Posts: 15790
Mon, Oct 20, 2014 @ 10:09 PM
Love this look and your post- lol!! You have reminded me that somewhere in my craft room is a little electric device that can sand, etc. (like a mini craft Dremel...hmmnn.. off to search :-)) Thanks for the inspiration!!