This birthday card, made for friend and fellow stamper, Deb was created in 2011, and is the 3rd of the 3 Blast From The Past Cards I found on an older laptop recently. I knew this particular card needed to be uploaded but forgot about the previous 2 (Sally's Birthday Card 2011 and Bill's Birthday Card 2011). All three (Sally, Bill, and Deb) are members of the same family--they are dear family friends.
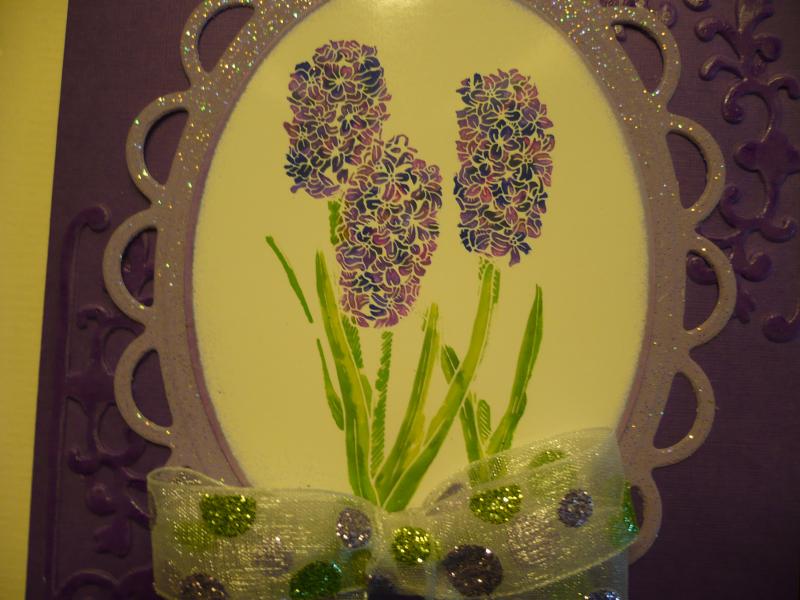
This is the close-up view of the stamped image of the beautiful lilac stamp in the Shadow Flowers #5 cling stamp set by The Local King Rubber Stamp Company. Please see other views for information on this stamp company, and more about the creation of this card.
These three cards show my first efforts using the Direct Coloring onto Rubber Stamps with Marvy Markers coloring technique. I found this technique to be really easy and straight-forward, especially after watching Lisa, co-owner of The Local King Rubber Stamp Company several years ago at the company booth at a large stamping/scrapbooking show near Toronto, Ontario Canada.
Lisa has created some YouTube tutorials online, and as well she has 2 technique CDs that can be purchased. Do watch her free YouTube, and I think you will have enough information to start playing with this technique. And if you have other water-based markers, I'd try those before purchasing Marvy markers.
I was told that because Marvy markers dry slower, it makes it easier to do this technique. I didn't have to do the traditional "huffing" on my stamp when I was finished coloring, nor did I have to rush coloring. I am not sure if that would be the same using Stampin' Up or Tombow or other brand markers--you will only know with your own experience. Since I already had a good selection of Marvy markers (I bought mine at Michael's a few years ago), I used those as that is what Lisa and the other artists in the Local King booth used exclusively. Lisa has great tips about creating some neat backgrounds using word background stamps and advice on how to create a more distressed look. I chose to keep it very simple for my first efforts, and only distressed the edges of the oval with SU lilac ink using a sponge dauber.
In this view, you can see a bit of the depth of the embossing folder, and how adding Glossy Accents helps accentuate that dimension. The entire lavender frame (made with Spellbinders Lacy Ovals--one of my all-time favorite die sets ) is glittery, but I was not able to take a photo that shows this without getting a great deal of glare from the glossy cardstock as a negative side effect when I had more glitter in the frame on my shot--sorry!
I included this close-up view so that you could really see how the colors of the Marvy LePlume and Brush markers (always using the brush end) just come alive on this amazing glossy cardstock from The Local King Rubber Stamp Company. I know very little about the cardstock except what I was told at the craft show at the Local King booth, and that was that this glossy cardstock is not like other glossy cardstock. It is imported (I do not remember its origin, I am sorry, perhaps the Orient?), and there is a clay component to this card-stock. If you are blessed to ever see a Local King Rubber Stamp booth at a craft show (highly likely as this company travels all over North America doing MANY craft shows, especially those that specialize in stamping and scrapbooking), DO stop in and take a few minutes and watch co-owner Lisa or Nader (both are good, but Lisa is THE expert) in action, and within a short time, you will be able to create your own amazing masterpieces using this very easy coloring technique. Marvy markers are easily accessible, and are not expensive, plus there are over 100 colors to choose from. They are water-based, but I have found that they blend well.
Sometimes Lisa uses the black marker in an almost scribble manner to help blend, but most of the time I haven't found that to be necessary to have the colors blend--but I am just starting with this coloring technique, and I have MUCH yet to learn. Marvy makes a blender marker I believe, I have not tried it yet...
Thank you so much for stopping to check this close-up view of the lilacs on this card I created in 2011 as a birthday card. When you leave a comment, I am thrilled--it makes my day!!! It is my goal to learn from your comments and all I see here on SCS to improve and to become a better card-maker.
Have a great day!
Joanne
Date: Monday, August 18, 2014 GMT Views: 2136
Favorited:2
Registered: May 31, 2009 Location: East Tennessee enjoying the mountain views Posts: 32997
Thu, Aug 21, 2014 @ 1:59 AM
Very pretty Joanne, how cool to find a few cards from the past. Love the color variation you achieved with the marker technique. The sparkle gives it that little extra we all love. Thank you so much for your sweet comment and I hope you continue to create and enjoy what you love to do
Splitcoast Dirty Dozen Alumni Proud Fan Club Member
Registered: June 19, 2010 Location: SC Posts: 6005
Fri, Aug 22, 2014 @ 7:56 PM
Joanne, you're just the sweetest. And we all love your visits to our galleries. This is a lovely card, and you've achieved a nice color gradation with the Marvy markers - very nice purples and lavenders. The sparkle along the edge of the frame is a special touch that your friend will love, and like Irene said; we ladies like our sparkle *giggle*
I'm so glad you're stamping Joanne. I look forward to seeing your journey. Please feel free to ask any questions you may have. If I have the answer it's yours (she smiles).
Registered: February 9, 2010 Location: Mentone, California Posts: 7361
Fri, Aug 22, 2014 @ 11:13 PM
Your coloring on these hyacinths ROCKS! Great job with the direct coloring to stamp technique...lovely effect achieved with it. Love the EF behind the image and the glittery frame!
Registered: January 20, 2010 Location: Brampton, Ontario Posts: 26218
Mon, Aug 25, 2014 @ 4:51 AM
What fun to find an older card! I too am a fan of Local Rubber King stamps. Great artistry and quality! I always enjoy watching Lisa at the shows. Your beautiful colouring really brings these hyacinths alive! I have a clump of these, in just that colour, that I look forward to seeing every spring like old friends. :-)
Registered: September 20, 2006 Location: Sarnia, Ontario, Canada Posts: 3734
Mon, Aug 25, 2014 @ 3:31 PM
What beautiful colouring. Great details. Thanks for all of those. I love Local King. I live in Sarnia, ON, so it looks like we live near each other if you went to a show in Toronto.


 ) is glittery, but I was not able to take a photo that shows this without getting a great deal of glare from the glossy cardstock as a negative side effect when I had more glitter in the frame on my shot--sorry!