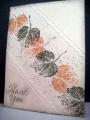
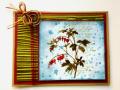
I used the Needlepoint Border EF at an angle to create an area to stamp the leaves into. Then I used a Cuttlebug folder with the words THANK YOU on it in the lower corner using just the corner of the cutting plate so I wouldn't damage the embossing near it. To highlight the words I used a sponge dauber with Early Espresso ink to darken it a bit.
Thanks for looking!
Date: Tuesday, April 8, 2014 GMT Views: 3473
Favorited:17
Registered: May 9, 2007 Location: Wisconsin Posts: 8704
Tue, Apr 08, 2014 @ 5:25 PM
Love the angles and the leaves are gorgeous.
------------------------------ Mary ~~ QFTD #152, FS#514CC Guest Design Team 2012, 2013, 2017 & 2022 2014 CAS Spring Design Team MemberSC Guest Design Team 2015 & 2022 Dirty Dozen Alumni SU Consultant "Life's greatest adventure is finding your place in the Circle of Life" - Lion King
Registered: December 15, 2011 Location: Abilene TX Posts: 11275
Tue, Apr 08, 2014 @ 5:40 PM
This is beautiful! Outstanding job getting the embossing exactly where you wanted it - never seems to work for me, lol.
------------------------------ JodyLynn - "Love me - love my cats!" DTGD12, DTGD14, HYCCT12, HYCCT13, HYCCT14, HYCCT15, Love Fest 2013, Love Fest 2014 CAS and CC guest designer QFTD 258
Registered: July 9, 2008 Location: Stars Fell on Alabama Posts: 75073
Tue, Apr 08, 2014 @ 7:29 PM
Super job and a beautiful card.
------------------------------ My Blog---My Gallery---My PinterestI'm a Punchkateer! (Prez) FOREVERDirty Dozen Alumni2014 CAS Spring DT--- Inspiration Challenge Co- Hostess 12/02/17-12/28/19 Watercolor Wednesday Design Team Hebrews 13:2Brenda
Registered: September 21, 2006 Location: In the beautiful Sequatchie Valley, Home of the Paper Clip Project - The National Cornbread Festival Posts: 26563
Registered: September 21, 2006 Location: In the beautiful Sequatchie Valley, Home of the Paper Clip Project - The National Cornbread Festival Posts: 26563