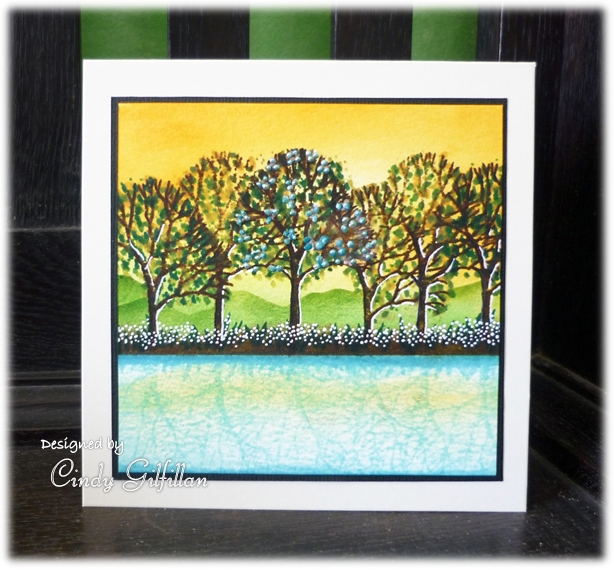
This is my first try with these new tree stamps – ‘Dead trees’ my husband called them, so I’ve decided to add foliage to the branches to give them life!
Firstly I sponged a pale yellow sky, right down to below where the water line will be (this will look like a sunny reflection later). Deeper yellow added to the top of the sky.
Masked the river & mountains with sticky notes, sponged greens on the mountain range, then brown for the river bank.
Leaving the river mask in place, stamp the trees, varying the heights. Flip the mask around, covering the trees, and using direct to paper technique, swipe the light blue ink pad right across from one side to the other. Repeat if necessary, but donÂ’t overdo it, some bare white spots are needed to look realistic. Stamp the trees upside down in the same blue ink to create the reflection. Tilt the ink pad and swipe a thin line along the top & lower river edges - creates shadows.
Remove the mask. Use markers to dot foliage in yellow and greens on the tree branches. Flick little dark green lines up from the brown riverbank to create ground shrubbery. Mirror the flicks on the river with blue marker. Add white gel pen dots to the shrubs; and a white line up each tree trunk. Add blue pearl pen dots to the branches of the centre tree for ‘flowers’.
To finish: layer on black card stock, then a square cream card.
For the gratitude Central Theme – Thank you is stamped on the inside…I hesitated to stamp on the front, wanted to be left as a scenic picture, a bit more masculine that way I think.
Date: Sunday, November 24, 2013 GMT Views: 1662
Favorited:10
Gorgeous! I love the gel pen work! I am a big fan of the "dead tree look" but you did a fabulous job showing the trees in all their finery as well! This is going in my faves!