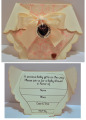
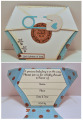
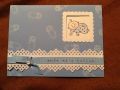
THERE ARE 3 CARDS IN MY GALLERY MADE FROM THIS PATTERN. Begin with 8 1/2" X 7" pc of card stock. Measure down 3 1/4", score & fold. The fold is the bottom of the diaper. Leaving card folded, mark 3" in from both sides on the fold. Mark 1" down from top left & top right corners. Cut between the 1" & 3" marks on both sides, making the leg openings of the diaper. The cut should measure 4 1/8". Now open the card, and on the shortest side of the fold (measures 3 1/4 to the fold), mark 2 1/2" in from both sides of the fold. Then mark 2 1/2" in towards the fold. Connect your marks and cut this section off of both sides. Fold diaper, score diaper tabs on back of diaper & fold tabs over front of diaper. Finish appropriately for boy or girl. There are 3 samples in my gallery. For the girls I use the SU Scallop corner punch & SU Scallop trim border punch across the back of the diaper. Then I use lacy trim across the top of the front of the diaper, the legs and 3 slightly curved rows on the back of the diaper. On the boy card, I used K&Co adhesive border across the top of the back of diaper continuing around on the diaper tabs. For the leg openings I used the SU Lg Oval Punch to curve the front leg openings. The diaper pin brads are Recollections from Michaels. I haven't tried this yet, but thought eyelets would be good to use where the cord/twine runs through the card so the card wouldn't tear as they take the cord in & out to open it. I've relocated and am still getting my craft room organized and haven't located all my fun tools yet! This card is much easier than it sounds and the card is always a hit- have fun!
Date: Friday, November 8, 2013 GMT Views: 4406
Favorited:10