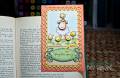
The top of the inside uses the same paper as on the card front. I created the emblem by cutting “Spellbinders Labels 20, Die #4” out of White cardstock and Die #3 out of Blue Cardstock. Adhere the 2 pieces together. Glitter the edge in Stickles Waterfall on the blue and Frosted Lace on the white.
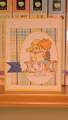
To create the school emblem I used “Microsoft Office Word Art”. The banner in the center is from Spellbinders Ribbon Banners. All the words were written and sized around the banner. I used Word Art to get the shape I wanted. Then, I separated each of the sections and printed them on cardstock. “Cut and emboss” the ribbon banner. Use your blending tool to add color to the embossed areas. Hand cut the remaining 2 pieces. Glue the whole emblem together and, using Dimensionals, adhere to the card.
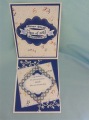
On the inside bottom I used the same blue as on the card front. Cut the DSP 4 ¼” square and adhere at an angle. The center lace area uses a 3 ¾” square of blue. The edges are punched using Martha Stewart’s “Double Loops Corner and Border punch. Die cut your words using Labels 20 Die #2. Add “Dazzling Diamonds Glitter” around the edges and the lace piece. Cut and glitter 2 of the Memory Box Snowflake Corners. Adhere to card as shown. Adhere the Lace section to card using Dimensional.
Date: Tuesday, June 11, 2013 GMT Views: 678
Favorited:2