Registered: March 27, 2003 Location: Michigan Posts: 81
Sat, Aug 14, 2004 @ 4:05 PM
Thank you very much, Laurie. I had a heart attack this past January and afterward I just could not stamp or create anything for a long time. I think I was feeling badly awhile before the H.A. too. Recnetly I've been casing a lot of others' work and I feel more creative and have a desire to stamp more often.
Just love the colours and this idea for a thank you. I have made slide cards but never a spinner - can you share the directiosn please??? [email protected]
Registered: October 12, 2004 Location: Addicted with the rest of you. Posts: 11036
Thu, Oct 14, 2004 @ 4:31 PM
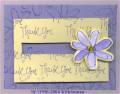
I love the Idea of not using the whole front for the spinner part and having the two backrounds to look at.it's also eye catching.The color combo is great too. [email protected]
Registered: March 27, 2003 Location: Michigan Posts: 81
Sat, Oct 16, 2004 @ 5:29 PM
I'm no expert but got some expert directions from Joleen, thanks to Mary Z. You need 2 pennies, dimensionals, cardstock, stamps, inks, ruler, etc. Make your card base and attach a top layer of cardstock (stamped if desired, you can look at examples on our website). Make another layer slightly smaller than the top layer. Stamp if desired. Cut a long rectangle notch out of this one, no wider than 1/2 inch. The spinner will fall out if too big, not spin if notch is too small. On the underside of it, place 6 stamping dimensionals, 3 at the top and 3 at the bottom. Need to have depth for your spinner to spin. Stamp your spinner and cut out. Mat it. Adhere the pennies together with a dimensional. Adhere the spinner to the top penny with a dimensional. Place the spinner in the notch from the middle, then adhere that mat with the 6 dimensionals to the card. Watch your spinner go back and forth. If you spend many hours watching it do this, you will need to be committed. I found I was having way too much fun watching mine, haha.