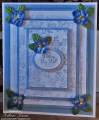
This was another experiment. I wanted to add a lacy edge with the inside paper peaking out. I wish I had made the border on the right, where you can see the inside paper narrower, but it was trial and error.
I used a piece of DP that had a white background from my stash. It was folded so the pattern was on the inside. Then I measured what I thought would be a good border, and cut the front side to that amount. The edge was punched with an MS border punch.
Next, I cut another piece of matching DP and mounted it on the white side of the first piece, leaving the white lace edge uncovered. It looked sort of unfinished, so I mounted ribbon up against the edge.
I decided I wanted a sentiment on the front, and liked this Spellbinders tag. The only sentiment I had that fit in it when it was mounted vertically was this one from JustRite. It was stamped using Brilliance Sky Blue, but was too light to read, so I embossed it with Gold EP, and it was better. Next, I shaded it with the Brilliance ink, colored the roses with Copics, and went around the outside with the Krylon pen.
I knew I wanted flourishes around the tag. I really wanted those Cheery Lynn ones, but those are some of the dies which have always been out of stock whenever I've placed an order from a place which carries them and wanted to add them. The only flourishes I have are the ones in the Spellbinders Twisted Metal Tags and Accents set, so I used those, and shaded them with Memento Bamboo Leaves. The tag was added dimensionally over the flourishes, and I added some pearls and a bow.
I cut another wider Spellbinders tag for the inside as a writing space, and shaded that with the Brilliance ink as well.
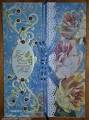
There is another photo showing it open on my blog.
Date: Sunday, February 3, 2013 GMT Views: 272
Favorited:2