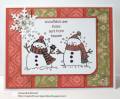
I started with a Solar White card base and added a piece of wintry patterned paper to cover the card front. I die cut 3 circles from Whisper White, then embossed them with the D'Vine Swirls embossing folder. I created a hat from black card stock and attached it to the "head" of the snowman. I stamped my sentiment on Whisper White in Versafine Onyx Black and heat embossed it with clear embossing powder, then attached it to a piece of black card stock. I cut a strip of blue card stock and embossed it with the Swirls, Ribbons and Snowflakes embossing folder, then cut the end to a point.
Once I had all the elements cut and stamped, I attached them to the card front. I carefully applied Star Dust Stickles to the raised embossing on the snowman. I wanted to add some dimension to the snowflakes on my blue piece, so I added Stickles to the centers. I quickly decided I didn't like the way that looked, so I added tiny pearls to the centers instead. I set the card aside to dry overnight (and somehow managed not to smear my Stickles, which was quite a feat for me!).
Paper: Solar White 110 lb. card stock (Neenah); Whisper White card stock (Stampin' Up!); Arctic Wishes Matstock (DCWV); black card stock, blue card stock (unknown)
Ink: Versafine Onyx Black (Tsukineko)
Accessories: Circles #2 die (Sizzix); D'Vine Swirls embossing folder (Cuttlebug); Swirls, Ribbons and Snowflakes embossing folder (BasicGrey/Sizzix); Big Shot (Sizzix); clear embossing powder (Mrs. O'Leary's); Star Dust Stickles (Ranger); tiny pearls (Zva Creative)
Registered: February 5, 2007 Location: St. Louis, MO Posts: 92381
Thu, Dec 06, 2012 @ 1:50 PM
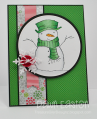
What a lovely snowman with the embossing and shine. I like how you left him in a more abstract state...without a "face" and all the details we are usually tempted to add. A lovely card, Amy.