Every year my Christmas gift to my customers is a workshop that I call "Little Gifties." In that workshop, I share ideas (and let them make samples) for little stamped gifts that don't cost much to make, but go a long way in showing someone you care about them.
This is one from my 2012 Little Gifties workshop.
The deets:
Count out 25 sheets of Staples Brand Bright White Laser Paper. Cut each sheet in half lengthwise.
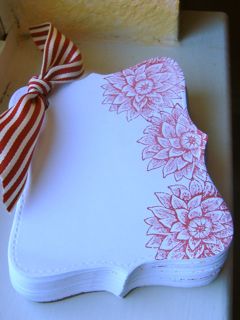
Use your Top Note die to cut the paper--twice for each half sheet. My Big Shot was able to do 5 at a time with no problem. When you are finished, you should have 100 pieces of notepaper.
Use your Top Note die once again to cut out a chipboard or posterboard backing for the notepad.
Cut out one sheet of colored scrap paper using the Top Note die.
Grab your 1/2" circle punch and decide the position of the corner hole. Cut a hole in the colored scrap paper. This colored sheet becomes your template for the hole in all 100 sheets. Once again, I could cut more than one sheet at a time. Cut one last hole in the chipboard for the backing--this one was a little tough, so you may choose to use posterboard rather than chipboard. Once the holes are punched, the colored sheet may be discarded.
Choose a wide ribbon and a color palette to match your ribbon. I stamped images and words from the Creative Elements stamp set in 5 different colors on the Top Note papers. I stamped on the edges of the papers, so that the papers could be used for notes. I stamped 20 sheets of the same stamp, but altered the position of the stamp each time. When I was finished I had 5 stacks of 20 sheets of paper. I collated these so that the stamped images varied each time a sheet would be used.
Slip a ribbon through the hole and tie a knot. Your friend will be thrilled to receive this little, very inexpensive gift and will think of you 100 times as she uses each sheet.
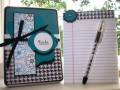
If you want to sweeten the gift even more, slip an RSVP Pentel pen decorated inside the barrel with DSP into the ribbon.
Pen Instructions: Cut matching DSP to 1 x 3 3/8" for the pen. Roll the paper around your bone folder to break down the fibers a bit. Now remove the ink holder from the pen and roll the paper around it. Slide the ink holder and paper down the barrel of the pen, then reassemble.
This is one from my 2012 Little Gifties workshop.
Edited to Add: IF I had this project to do over again, I would use the Oval Accent Bigz Clear Die instead of the Top Note just because you can easily cut more sheets of paper at a time. The Top Note is cuter, but got to be quite tedious before I was finished.
Date: Sunday, November 18, 2012 GMT Views: 5674
Favorited:30