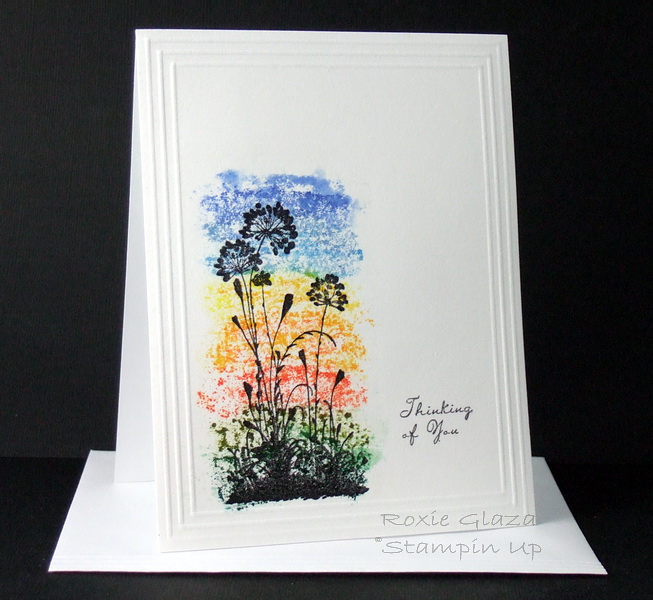
To make the colored background I colored an acrylic block with markers and purposely didnÂ’t color to the very edge of the block and kept the edges uneven for a more interesting look. Once all colors are applied to the block lightly mist the block with water and I found it helped the water absorb by placing the paper on a soft cushion such as a folded paper towel then place the block on the watercolor paper and move it around a little. If you want a little more color in an area just re-ink the block and repeat. For this card I did repeat at the very top of the blue and used a bit more water. I then stamped on the silhouette image.
The Scor-Pal and a metal ball stylus were used to emboss the lines around the edge and I just eyeball where to start and stop but you could make a pencil mark if needed.
The envelope on bother cards in this post were also embossed using the Scor-Pal and I went three lines on this card two on the one below to match the card front embossing.
Images: Stampin Up – Serene Silhouettes, Measure of Life – sentiment
Paper: unknown watercolor
Ink: Staz-On – Jet Black, Stampin Up markers except for on one Tombo yellow
If youÂ’d like to see a coverage of a larger area using more silhouette images you can click here for a direct to post blog link.
Date: Friday, August 3, 2012 GMT Views: 7938
Favorited:148
Registered: June 10, 2007 Location: BC Posts: 44872
Fri, Aug 03, 2012 @ 6:25 AM
Truly a lovely and interesting card, Rox. I like your different colours and the effect that they have. Into my fav's - eventually I plan to get this SU! set. Lovely card!
Splitcoast Dirty Dozen Alumni Creative Crew SU Design Team Alumni
Registered: October 29, 2004 Location: Coos Bay, Oregon Posts: 24007
Fri, Aug 03, 2012 @ 8:57 AM
Roxie, what a beautiful and creative watercolor background for your perfect silhouette image. I love your added score lines. The perfect final touch. TFS your card and description. Into my favs.