Sorry this description is long but if I have time I'd like to put everything out so you don't have to go to a post on my blog....at the end I did post the blog url in case you want the cricut cut file.
-----------------------------------------------
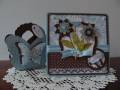
First, I took a standard size A2 white card and covered it with Dark Green Cardstock. I do that with these smaller size card because I want the base of the card to sort of act as the matting for all the pieces of paper. I don't want to make the paper pieces any smaller...which is what I would have to do if I did a matting for each.
I cut all the paper strips with my Fabulous Find Cricut Cartridge. I ran the Bazzill “Bank Roll” green cardstock through Cuttlebug's Snowflakes Embossing Folder. I used my Ink Applicator Tool along with Peeled Paint ink and ran it across the embossing to being it out. After the paper are attached I added the wooden tree. It came completely painted. The one thing I added were Faux pearls. I added them to the circles that were painted on the tree. I also added some star gems. I needed a very strong adhesive to keep it in place because it is kind of thick. I used Glossy Accent but you could also use glue dots.
Then I cut a Spellbinder label 5 and added a heat embossed “merry christmas” to it. I added a small stocking to the right and a couple round candy's.
SUPPLIES:
A2 White Card base ( 4 x 5.5)
Cricut Expressions
Fabulous Finds Cricut Cartridge
Spellbinder Die Cut Label 5
Cuttlebug
Cuttlebug Embossing Folder “Snowflakes”
Fiskars “Tis the Season” clear stamps
Distress Ink: Peeled Paint and Ranger's Ink Applicator Tool
“Celebrate it” Small Stocking and the Wooden Shaped Tree
Creatology Candy Canes
White Embossing Powder by Ranger
Recollections Faux Pearl
Foam Sheets for dimension
The Paper Studio Star gems
Adhesive:Glossy Accents, Glue Dots, Tape Runner
PAPER USED:
The Paper Studio (hobby lobby): Holidays Dots, Candy Cane Stripes
Bazzill “Bank Roll” (light green cardstock)
Green Cardstock
Core'dinations Red Cardstock