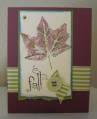
1) I took a scrap of vellum and first laid down a water wash over the surface. Vellum is coated and the water wants to bead up, so you have to work at getting the whole surface wet. The vellum also has a tendency to curl, so I held a couple of the corners down with something heavy. This curling is part of what makes the leaves look realistic.
2) I then randomly touched a brush loaded with a bit of re-inker to the wet surface.
3) I sprinkled a little Kosher salt over the wet painted surface to make a mottled design. Scrape the salt off as soon as the water dries to prevent it turning the re-inker white and attacking the coating on the vellum.
4) Once it was dry, I stamped the leaf outline onto the painted side and stamped the unpainted side with the Weathered BG.
5) Once everything was completely dry, I sprayed the painted side with matte-finish fixative.
6) I then went over the outline with my gold pen. Outlining before cutting made it easier to cut.
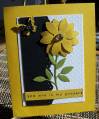
7) After the fact, I decided to use one of my Itty Bitty Background stamps to make a few black spots. If I were to do it again, I would do this step before outlining/cutting.
The leaves are adhered with small glue dots.
My itsy-bitsy GALLERY where viewer comments are welcomed & always appreciated!
Date: Friday, October 14, 2011 GMT Views: 5191
Favorited:57