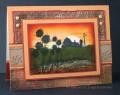
The farm image is from a bookmark image which you can see in this SCS link. You could ink up just that portion of the image with a marker or do what I am famous for and thatÂ’s separating an image into pieces. I do it in a way that they fit back together like a puzzle and stamps as one piece. My rubber is unmounted with AleeneÂ’s Tack it Over and Over applied to back for a temporary stick.
To create a mask the farm image was stamped on paper then I tore to the image at landscape level on both sides then cut the image portion of the paper with scissors, save both pieces to be used during the sponging procedure.
Decide where the farm will be placed on the panel and mask off the ground portion with the lower half of the torn and cut paper, also punch a 1” circle from a sticky note and place it on the panel for the sun.
Sponge on the sky starting at the bottom with the lightest color and work up changing colors four times with red being the last color.
Remove the masks and now mask off the sky portion. Tear a second piece of paper to separate the ground area and sponge on the lightest color, switch that second piece again and sponge on the darker color.
Now the panel is ready to stamp on the images, ink distress the edges and the panel is ready for assembly.
Images: Biblical Impressions
– 39105 Behold, 35715 Small Gilias, Large Gilias, 38917 Grass, 38909 – Grass, 38924 – Grass, 38925 Field Grass
Accessories: Bazzill – brads, Marvy fine tip black marker
Tools: embossing folders - Stampin Up Square Lattice, Tim Holtz/Sizzix Brick, Tim Holtz – clear ruler for piercing guide, and Bazzill piercer, sponge, scrap papers stamp positioner, fingernail for distressing
Beautiful rural scene, Roxie! Love the gorgeous sunset and silhouettes! The peach colored paper is so pretty and I like the grasses on the horizontal strip!