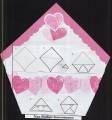
This is made using a technique I learned at convention. I rolled the wheel twice. Regal Rose ink for the first pass and then white Craft ink over and just in front of the first pass. To do this ink the wheel with regal rose and then tilt your head so that you can view the wheel seam edge and then carefully line up the bottom edge of the paper with the wheel seam. Roll a straight line with the wheel by lining the outside edge of the paper with the wheel or by using a straight edged wheel guide. Clean the wheel and ink it with white craft ink. In the same manner as before find the wheel seam and position it so that it is slightly ahead of the placement you did before on the first pass. The seam should be about 1/16” over and in front of the edge of the cardstock. Carefully roll the wheel over the previous image. You will have a have stamped image that looks very much like it was dry embossed. You can also stamp regular stamps in the same manner by using your stamp-a-ma-jig for perfect placement. If you want to repeat this stamping technique again on the same project with additional stamps or more passes with the wheel, be sure to keep all of the white stamping on the same side of all over stamping so that it resembles the side a light source would be shining. This technique could also s be done using a versamark pad in a tone on tone watermark stamping or clear embossing and then with white craft that. This card is a Nan original.
Date: Saturday, January 7, 2006 GMT Views: 2823
Favorited:91
Registered: November 28, 2004 Location: the Florida wilderness Posts: 20588
Sat, Jan 07, 2006 @ 5:47 PM
Wow! This really does look like it was dry embossed. The effect is beautiful and the whole card is lovely. Thanks for sharing the instructions as well.