Dimensions:
Card Base – 4 by 5.5 inches
Background paper – 5.063 x 3.5
Background matting paper – 5.313 x 3.75
The 6 Squares – 1.423 x 1.423
Squares Matting – 1.55 x 1.55
SUPPLIES:
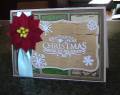
-Cricut, Fabulous Finds Cartridge
-Spellbinder Label 8 die cut
-Various papers
-Distress Inks: Walnut ink, Tea Dye and Embossing Ink pad
-Ink Applicator Tool
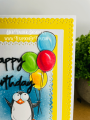
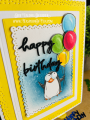
-Stamps by Inkadinkado:
98397 “Snowflakes A-Plenty”
99405 “Holiday Expressions”
-White Embossing powder
-Green Ribbon
-Pointsetta by the Christmas Shoppe
-Glue gun
I used the Fabulous Finds Cricut cartridge to cut out 6 squares, the background and all the matting. I had to choose a lot of papers that went well together.
First, I pick out the papers for the squares (and work around those colors). Then, I choose a background paper to put them on and also a paper for the matting. Then I choose the matting for the squares. In most cases all my matting is the same paper/color.
I added walnut distress ink to the edges of the squares before adding the matting to them.
Next, I worked on the Spellbinder die cut. After cutting it out with my Cuttlebug I stamped the phrase and the snowflakes using an embossing ink pad. Then I heat embossed with white embossing powder. After heating it up I took Tea Dye Distress Ink and covered the die cut with it keeping the Label 8 on it, AKA stenciling. The embossing powder is a great resist.
Lastly, I added a ribbon and a poinsettia.
The Sandwich for using your Spellbinder die cuts with your Cuttlebug isÂ…
To Cut, from bottom to top:
Plate A
Plate C
Die ridges face up
PAPER FACE DOWN on top of the die
Plate B
Date: Wednesday, January 19, 2011 GMT Views: 470
Favorited:3