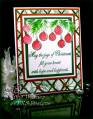
This is for TLC301. For this sample all images are Our Daily Bread designs. I used theFaux Tile Background Tutorial exactly as written for the background and stamped the poinsettia bg with red ink. After the tile edges were sponged, I added a few highlights with a gold gel pen.
I stamped the mistletoe tag and sentiment on a separate piece and used the gold gel pen again. The dk red layer has the corners punched. The poinsettia embellishment was made with several punches and a little metallic bronze card stock. Three red rhinestones were glued in the center. Finished card measures 5.5 x 4.25.
Thanks so much for looking! My blog:The Write Stuff. Sorry! I had to delete a bunch of really old posts from my blog & this is one of them. But you can still the tutorial by following the link to it (above in 1st paragraph)
Date: Sunday, November 28, 2010 GMT Views: 3261
Favorited:20
Stamps: ODBD- Poinsettia Bg, Blessed Christmas, Mistletoe Tag
Paper: Neenah white
Paper Size: A2
Ink: Colorbox Fluid Chalk warm red
Accessories: ODBD tag die, Martha Stewart gothic arches corner punch, lg chrysanthemum punch & branch punch, poinsettia punch (All Night Media), red rhinestones, Scor-It, gold gel pen
Registered: February 3, 2005 Location: Delray Beach, FL Posts: 34769
Sun, Nov 28, 2010 @ 9:34 PM
Julie, this is beautiful! I am SO glad to see your tutorial...I did this with BeckyTE a few weeks ago, and we actually cut ours apart -- yikes...a lot of work! Your way is WAY better and easier...and what a perfect card! Definitely need to do another -- your way! LOL!
------------------------------ Cheryl
Proverbs 3:5-6 My blog
Registered: July 13, 2004 Location: Wishing I lived closer to my kids! Posts: 61028
Mon, Nov 29, 2010 @ 6:43 AM
Julie, this is gorgeous!! I wanted to get a headstart on this early this morning, and I had a computer virus! Bleh! Finally got that off and hope to play later today. I love the richness of this card and your tiles are awesome!