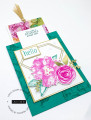
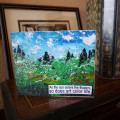
This is my calendar for next year. I started by picking out the calendar inserts I wanted and cutting some matboard to fit as front and back covers. My calendars tend to get very heavily used, so my goal was to design something that would endure well in my purse... that is why I made sure that all my design work was going to be covered by the transparency.
I cut the patterned paper and transparency to the matboard size, stamped all of my images and cut them out, then adhered them really well to the patterned paper. I then stuck the patterned paper down to the matboard. I cut the foil tape into the right sized strips using my paper cutter. This is where it got tricky... I had to hold the transparency in place while adhering the foil tape to the front of the transparency and sticking it to the inside cover (which was previously covered with patterned paper). I did each of the 4 sides with 4 different strips of tape to make it easier. I should also note that each layer with punched with the rubicoil before adhering to each other and before covering with the foil tape.
FYI - this patterned paper by KI is sparkly (which I LOVE!) but it does NOT stamp well! That is why I cut the images out and stuck them on. It reads "all our Witty days" as my last name is Witty. I could not find an alphabet for the "days" part that looked right, so I used the "It's your day!" stamp from All Year Cheer and marked the "day" part, then used the stampamajig to stick the "s" on the end!
The three ribbons really go on the inside and are bookmarks used to mark the pages I flip to the most - current day, current month, and the notes section. I got the beads at the Target $1 Spot this summer.
I have to say, this was a very rewarding project and something I will get to look at every day, so I didn't mind the extra steps involved. It was nice to actually make something for myself for a change!
Date: Tuesday, December 6, 2005 GMT Views: 1128
Favorited:13