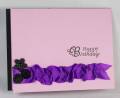
I created this card for the technique challenge to use ribbon some other way than a bow or a knot. I applied adhesive to the back of the ribbon and scrunched it, applying it to a small strip of cardstock before adhering to the card front. The sentiment is stamped with black pigment ink and clear embossed. I added the buttons, which were white but I airbrushed them with a copic marker and added them to the edge of the ribbon. I also backed the card with black, letting it show only on the left border.
I hope you like it.
Date: Sunday, August 15, 2010 GMT Views: 1257
Favorited:7
Registered: February 20, 2007 Location: Dallas, TX Posts: 5672
Mon, Aug 16, 2010 @ 5:23 AM
Love this card. Thanks for the how-to. Knowing about the lining layer under the ribbon will make this technique easier to try. And might I say you're looking quite svelte!
Registered: February 1, 2005 Location: Temple, Tx Posts: 37720
Mon, Aug 16, 2010 @ 6:05 AM
This is such a pretty birthday card, Karen!!!! Your scrunched ribbon is beautiful and I love how you added the buttons!!!!! Love your sassy new avatar, too...you sweet thang!!!!
Registered: July 9, 2008 Location: Stars Fell on Alabama Posts: 74652
Mon, Aug 16, 2010 @ 8:35 AM
Wonderful scrunched ribbon and love those buttons.
------------------------------ My Blog---My Gallery---My PinterestI'm a Punchkateer! (Prez) FOREVERDirty Dozen Alumni2014 CAS Spring DT--- Inspiration Challenge Co- Hostess 12/02/17-12/28/19 Watercolor Wednesday Design Team Hebrews 13:2Brenda
Registered: July 25, 2007 Location: Sterilite Country, Ma. Posts: 1166
Mon, Aug 16, 2010 @ 10:10 AM
I like this idea of scrunching the ribbon. It gives it a nice touch.
------------------------------ Beth: Yesterday is history. Tomorrow is a mystery. Today is God's gift, that's why it's called the present.
My Gallery CAS Summer 2011,2012,2014 Challenge - Guest Designer