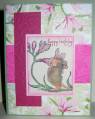
Measurements: image panel - 2 1/8 x 2 ¾” plus 1/8” border, red panel – 1 ½” x 4 ¾” plus 3/16” border, designer paper – 1 ¾ with 2/16” border
-I added a little color to the zebra image with Prismacolor pencil and used baby oil and paper stumps for blending. Same technique as Gamsol.
-The red panel is colored with alcohol inks using the felt and block. I cover the panel completely then apply ink sporadically to add darker areas.
-The designer paper was scored on the beige strips and I also scored the card base on each side of that panel.
-Ink distressing was done on all turquoise borders so it better matched the designer paper.
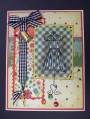
-The out of the box image using Nestabilites: a pictorial can be viewed on my blog in this link if you need photos and IÂ’ll explain how I achieved the technique for those that donÂ’t wish to leave SCS for directions:
I lie the Nestabilities die cut side up over the image and mark with a pencil on each side of the image that will be out of the box (youÂ’re marking on the inside of the die cut) and also make a couple small marks on the top or bottom for easy die cut line up. I cut the image slightly further than the mark to allow for the thickness of the metal. Flip the die over and slide it under the portion which was just cut and secure with repositional tape if needed (I use the blue painters tape). Run through the machine to cut then emboss and remove the die cut, erase the pencil marks and itÂ’s ready to color. I color after cutting just in case I make a mistake.
Date: Tuesday, June 22, 2010 GMT Views: 2598
Favorited:22