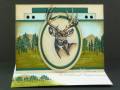
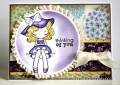
Measurements: scenery panel – 2 7/8” plus 1/8” border, blue topper – 7/16 x 4 ½”, green topper – 5/16 x 2 ½”, outside border of the oval – 2 ¾ x 3 3/8”
-The out of the box image using Nestabilites:
I lie the Nestabilities die cut side up over the image and mark with a pencil on each side of the image that will be out of the box (youÂ’re marking on the inside of the die) and also make a couple small marks on the top or bottom for easy die cut line up. I cut the image slightly further than the mark to allow for the thickness of the metal. Flip the die over and slide it under the portion which was just cut and secure with repositional tape if needed (I use the blue painters tape). Run through the machine to cut then emboss and remove the die cut, erase the pencil marks and itÂ’s ready to color. I color after cutting just in case I make a mistake.
-Prismacolor pencils, baby oil and paper stumps were used to color the image using the Gamsol technique found in the resources section here at SCS. Baby oil replaces the Gamsol.
-The deer was inked up using a VersaMark pen and heat embossed with clear powder to give the antlers some stability. I also applied black marker ink along the edge of the antlers that are out of box.
-The scenery panel was created by tearing paper into a mountain shape and masking off the sky, tear a second piece in half and mask off the ground area to sponge on the brown. I didnÂ’t mask off to add the blue sky. I did mask off the mountains bottom edge and sponged on the grass.
-I applied marker ink to the tree images and stamped using a positioner and continued stamping across the panel then added the grass with the same procedure.
-Ink distressing is done on all cardstock using a sponge.
-The nailheads are attached with Diamond Glaze (any lacquer product will work). To make the process fast and easy I squeeze a drop of lacquer onto a waxed paper (I repurpose the paper that stickers and labels are purchased on), touch the end of a large corsage pin to the lacquer then to the back of the gem which picks it up, position it on the image and press down with a finger, there is a little time to slide the gem into position if needed before it sticks tight.
-Paper piercing was done on the corners of the scenery panel.
-The deer panel is mounted on foam tape.
If you would like to see a closer view of the envelope and the inside you can click on my blog link here.
Tools: Nestabilities – long rectangles and ovals, Stampin Up mat pack, Bazzill piercer, stamp positioner, sponge, scarp torn paper, heat tool/gun, paper stumps
Date: Tuesday, June 8, 2010 GMT Views: 3993
Favorited:29
Registered: April 6, 2005 Location: Stuarts Draft, Virginia Posts: 14401
Tue, Jun 08, 2010 @ 8:11 PM
What a gorgeous masculine card, Roxie! Thanks again for asking me to make a sample sketch card...I thoroughly enjoyed using this layout!
------------------------------
Wanda Cullen ~ Dirty Dozen Alumni, On design team for Papertrey Ink, Designer for Color Throwdown and Fusion Card Challenges Cullen-ary Creations[/URL]...my blogHERE'S MY GALLERY[/URL]
Registered: November 27, 2004 Location: Carpal Tunnel ďż˝ slowed me down. Posts: 2272
Tue, Jun 08, 2010 @ 9:23 PM
Beautiful card - I love the background and the mountains, and the way you layered the Nesties really makes your super central image stand out. THis card is great in every way.