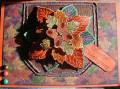
I love making medallion images! Holly Berry House has most of my favorite images, and this is one of hers called Autumn Leaves. Most people tell me that they are intimidated by medallions, but once you cut the first one out, it usually comes pretty easy from there.
For this card, I stamped and embossed the image five times on coordinating card stock. Make sure you use an embossing buddy or used dryer sheets to remove the static when you're using metallic embossing powders (or any type of EP on medallions). Decide which color image you want for the bottom and cut that image out about 1/4" from the edges. The rest of the layers should be cut out as close as you can get to the image without cutting into the embossing.
The fun part of the medallions is that there are no real rules! This card was made with five layers, but you could have easily used anywhere from one to five or more layers. I painted all of the layers with Twinkling H20s, but I also use Magic Scraps Glitter in the areas that I painted with the Twinks. After the layers dried, I rolled the leaves under a bit with the help of a pencil. Next, I adhered the layers together with pop dots. I try to put the Pop Dots or dimensional foam adhesive as close to the centers as possible so you can't see it clearly from the sides.
I adhered the image to the metallic matting that I added some fibers around the edges, and then glued that to the DP on the card blank. I didn't have matching brads, so I covered brads with embossing ink & dipped them into the embossing powder colors that matched the image. The brads were held with a clothespin to heat emboss since the metal gets REAL HOT quickly! Don't ask, you can probably guess how I figured that one out! lol Added the brads and a sentiment to finish the card. I told you this was easy and then I write a book about hot-to-do-it! Sorry, I'll try to shorten it the next time I post a tutorial!