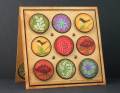
-The colored circles are cut with a 1” Cuttlebug die cut.
-I used the negative emboss technique - TLC160 - on the Cuttlebug embossing then added color with Prismacolor pencils and ink distressed the edges.
-I embossed the lines with the Scor-Pal
-Here is the names of embossing folders: Floral Fantasy, Perfectly Paisley, Birds and Swirls, Floral Screen
-The center and corner circles are popped up with foam circles.
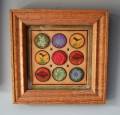
-The green panel is attached to mat board with tacky glue
-Spacers are inserted between the artwork and glass to avoid pressing on the embossing.
I forgot to take the photo before I assembled with the glass in place so there is a little glare especially at the corners.
My frame was purchased years ago and this is the first time IÂ’ve used it. Thanks for the challenge and a little push Dawn in putting it to use.
Tools: Cuttlebug embossing folders and die cut, Marvy - 1 1/16” punch, McGill -1/16” punch, Scor-Pal, sponge dauber
Date: Friday, February 5, 2010 GMT Views: 2135
Favorited:35
Splitcoast Dirty Dozen Alumni SCS Gallery Moderator Splitcoast Challenge Hostess Teapot Tuesday TEAm
Registered: July 27, 2007 Location: Dublin, Ireland Posts: 131819
Fri, Feb 05, 2010 @ 12:11 PM
I just love this. I still have your card like this in my Favourites, and linked to it just recently as my all-time favourite use of the embossing folders and negative embossing.
Registered: April 18, 2009 Location: Boston suburbs, MA Posts: 14060
Fri, Feb 05, 2010 @ 2:16 PM
This is gorgeous!!! Love the 3 x 3 circle arrangement. And again, the colors and textures are lovely. The brads are a really nice touch. Super framed project
------------------------------ ~ Emily ~ My BLOG
My kids are on SCS: ponyluvingirl (age 14) and Legoboy (age 10)
I'm a Punchkateer! ~ I design for DeNami Design Rubber Stamps