This challenge was perfectly timed!! This week my kids (ages 11 and 7) and I were talking about what to do for the classmates for Valentine's Day, and I suggested that we make molded chocolate hearts (we have chocolate melts left over from an event last month that really need to be used up). We decided to package them in little plastic bags and finish them off with cardstock bag toppers that they could stamp themselves. They were really enthusiastic about the idea!! So today's Limited Supplies Challenge (LSC255) to make a tiny card and a tiny treat was the perfect opportunity for me to make up a couple of samples to show the kids so they could get some ideas of what they could do when it's time to make their treat bags. They want to give their treats with store-bought character valentines (fine), but I'll send some tiny treats to family and friends and I'll make my own valentines. Silvia's tiny cards suggested in the challenge will be perfect!!
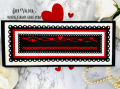
FRONT OF TOPPER (on left in photo):
To keep the layers to a minimum, I used some retired TAC conversation hearts stamps and stamped directly on the bag topper cardstock. It took a while to find the right shades of ink for these, but finally found some old Rubber Stampede spots that were perfect. An old TAC sentiment "a little something for you" was perfect for an oval and scalloped oval punch combination. My no more than 2 embellishments: little gold heart brads to affix the oval to the topper and a dainty pink grosgrain bow.
BACK OF TOPPER (on right in photo):
The back of the bag topper is very simple: I stamped "Happy Valentine's Day" and some To/From lines so the kids can sign their names to their Valentine treats.
The size of the topper is 4" by 2".
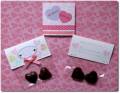
The size of the little card is 3" by 3". To keep layers to a minimum, I stamped the background with a tiny TAC lips stamp. I stamped two heart punches with "So Sweet" and "Love You". My two embellishments are two scraps of grosgrain ribbon along the bottom of the card.
Unfortunately, I couldn't get a good photo--everything looks washed out. It's hard to see in the photo that the little conversation hearts say "Hi", "Love You", "Be Mine", and "My Love." I also added white gel pen doodled dots in the scallops of the oval punch, and I don't think you can see that either.
But even though the photo isn't the greatest, I'm really happy with how these turned out. My kids are going to love them and will have so much fun making them for their classmates!
Date: Friday, January 15, 2010 GMT Views: 3271
Favorited:16
Registered: April 6, 2005 Location: Stuarts Draft, Virginia Posts: 14401
Fri, Jan 15, 2010 @ 8:09 AM
What an adorable treat for classmates...and so much better when your kids help with making them! Great idea!
------------------------------
Wanda Cullen ~ Dirty Dozen Alumni, On design team for Papertrey Ink, Designer for Color Throwdown and Fusion Card Challenges Cullen-ary Creations[/URL]...my blogHERE'S MY GALLERY[/URL]
Registered: December 2, 2009 Location: Chesapeake, Virginia (minutes from Virginia Beach) Posts: 4522
Fri, Jan 15, 2010 @ 11:38 AM
How adorable...I did similiar things when my children were younger...but this is just too cute!! Nice job...you are a wonderful mom making GREAT memories with your children!!
------------------------------ ...Lisa...
SCS Fan Cub Member...and LOVING it!!
I have a blog!!!
Simon Says Stamp Design Team SIMON SAYS STAMP