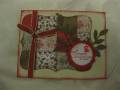
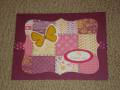
I just love these Top Note Quilt cards! They're so easy and it's so satisfying! I punched 2 1 1/4" squares out of the new Occasions Mini DSP. So that gave me 12 squares - use the front and back sides of 6 pieces of DSP for the 12 different patterns. Start with a piece of cardstock larger than the Top Note die and apply adhesive to the whole thing. I start at the middle - keep putting down the punched squares until you're done 4 across and 3 down. Then use the Big Shot and Top Note die and cut it out! It's like magic! Then I took my Choc Chip marker (small end) and did faux stitching along the perforation lines on the Top Note. For the ribbon and button combo, I used pink DMC floss and put the ends up through the button, leaving the loop under the button. Fold the ribbon, and put that into the loop and tie the floss on top of the button - easy! Then I used more floss to attach the Tiny Tag around the button. I also used the small heart punch to punch a piece of red cardstock that I had already run through the Perfect Polka Dots Embossing folder and popped that up on a dimensional. Thanks for looking!
Date: Wednesday, December 16, 2009 GMT Views: 2621
Favorited:86
Paper: Sending Love DSP, Very Vanilla, Choc Chip, Real Red
Ink: Real Red, Pretty in Pink (sponging on tag)
Accessories: Big Shot, Top Note Die, Choc Chip marker, DMC floss, Real Red Satin Ribbon, Pretty in Pink corduroy button, Medium Jewelry Tag punch, ticket corner punch, small heart punch, dimensional, Polka Dot embossing folder, dimensionals
Registered: March 2, 2008 Location: The Cellar Posts: 236
Wed, Jan 06, 2010 @ 6:34 AM
This card is a beauty. I love that you gave such a clear description of how it was done. All the details are amazing. I'm putting it into my favorites for sure. TFS