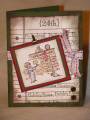
1) Create Your Own Snowman
2) Antique Brocade Cling Stamp
3) Holiday Sayings
To make it I did this stuff:
For the background card:
1) Folded a 5 1/2 inch square White card & Created a fat scallop trimmed in silver marker for the bottom
2) Stamped the snowy sky: repeatedly stamping Hero Arts' "Antique Brocade background") on black cardstock, in white pigment ink (and embossed in both clear embossing powder. Cut it to measure 5 2/8 inches
3) Made layers of hill shapes with patterned papers & embossing on two different Hero Arts stamps: the "Antique Brocade background cling stamp" & phrases from their "Holiday Sentiments"
4) Adhered the hills to the black mat
5) Pierced & stitched the hills with gray thread
6) Coloured the hills (outside the stitches in Copic markers to make a rainbow-coloured border.
7) Added white & rainbow coloured brads to make snow.
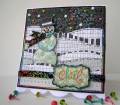
Making some embossed rainbow coloured velvet ribbon:
This ribbon is embossed crushed black velvet ribbon (using the "Antique Brocade" stamp and embossing ink with white embossing powder. I tinted the white embossing with Copic markers to make it rainbow coloured.
To make the snowman:
1) Embossed the circles (from Hero Arts' "Make Your Own Snowman" set) & face in black on patterned paper & cut them out.
2) Added heat & stick powder & Iridescent Ice glitter (from SU) over the patterned paper
3) Beaded the mouth & eyes by sewing on seed beads.
4) Added a brad for the nose.
5) Adhered the snowman's body to a strip of cardstock (hidden by the circles)
6) Added the scarf (made by embossing ribbon & tinting it with Copic markers (as above) then cutting it & melting the cut parts to prevent fraying.
7) Made a hat & coloured & cut it... Stitched a button on to hold the scarf
To make the sentiment:
1) Coloured the word "Chill" (also from Hero Arts' "Make Your Own
2) Snowman" set) in markers & then stamped onto Vellum cardstock & embossed the marker.
3) Embossed the Hero Arts "Antique Brocade" pattern in white on Kraft cardstock to layer underneath.
4) Cut them both into a curvy label shape & sewed it together, adding beads around the outside
5) Edged it with a black Copic marker around the stitched beads
Thank you SO much for taking a look!
:O)
mel
Date: Tuesday, November 24, 2009 GMT Views: 1380
Favorited:6


 Stitched a button on to hold the scarf