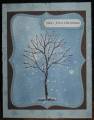
This simple looking card took more work than it looks - but it was a learning process for me. I first cut out a Whisper White piece using the Top Note die from SU. I then stamped the tree on the Whisper White cardstock in Choc Chip ink. Using my trusty stamp-a-ma-jig I then stamped the tree again (on top of itself) in Versamark ink and then sprinkled Glassy Glaze Enamel (SU) and embossed. In the process of embossing, some of the glass pieces were "blown" off the tree and onto the Top Note sheet. This became a blessing in disguise as it later became some of my "snow".
The reason I stamped the image twice was to have the tree look like it was covered in ice and dripping with ice (the glassy glaze) - I think up close it does look like that - but really hard to photograph.
I then used Soft Sky, Baja Breeze & Brocade Blue and sponged them onto the Top Note. I left it a bit lighter in the upper left to try and show some light coming down on the tree. I just kept sponging until I had the look I wanted.
I then used a Versamark pen and colored one snowflake from the snowflake stamp in Branch Out and stamped that snowflake twice (upper left and lower right) and then embossed using white EP.
I then used a fine tip glue pen from Tombow and put a dot here and a dot there of glue and traced a few tree branches and the"ground" under the tree and then sprinkled glitter on them and tapped off excess. Again - hard to see in the photo - but the whole image has a glittery look.
I cut out the top note and layered on top of another top note cut from Baja Breeze. Layered on top of a Choc Chip piece that's been embossed with a CB dots embossing folder. All this is then mounted on a piece of Soft Sky card base.
The snowflakes on the card base are from the Serene Snowflake stamp set and are stamped in a mixture of 2 drops of Pacific Point reinker mixed with Platinum Shimmer Paint (from SU holiday mini) and then daubered onto the snowflake stamp and stamped. They have a metallic blue shimmery look to them.
The edges of the card are slightly distressed (because I added the glitter mentioned above AFTER everything was mounted and in shaking/tapping off excess I dinged up the bottom of the card - so then I dinged up/distressed the rest of the edges to match!) ;) he he
TFL and let me know what you think.
Date: Wednesday, October 28, 2009 GMT Views: 1911
Favorited:34
Registered: August 22, 2005 Location: Beautiful British Columbia, Canada Posts: 1225
Wed, Oct 28, 2009 @ 1:36 PM
This is such a pretty card! Oh my goodness, I can somehow see how it would shimmer. You did a wonderful job and I love how you went with what ever happened - it totally works. Thanks for taking the time to explain how you made it! TFS!
------------------------------ Treena
My gallery: ink|outside|the|box "My brain has a mind of it�s own.�
Registered: May 18, 2008 Location: Virginia Posts: 24623
Thu, Oct 29, 2009 @ 11:00 AM
My goodness Karen, you sure did go through a lot to make this card, but it was well worth the effort as it came out beautifully. A really good snow scene here. I love all the sponging and glitter. A terrific holiday card. Have a great time at your stamp camp and get those holiday cards done!! TFS!
------------------------------ Pam Co-Founder of The Punchkateerz! Fan Club Member FS149, QFTD44


 I first cut out a Whisper White piece using the Top Note die from SU. I then stamped the tree on the Whisper White cardstock in Choc Chip ink. Using my trusty stamp-a-ma-jig I then stamped the tree again (on top of itself) in Versamark ink and then sprinkled Glassy Glaze Enamel (SU) and embossed. In the process of embossing, some of the glass pieces were "blown" off the tree and onto the Top Note sheet. This became a blessing in disguise as it later became some of my "snow".