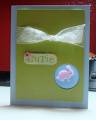
I got my inspiration for this card from a commercial greeting card but constructed it much different.
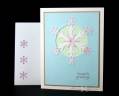
THE CARD:
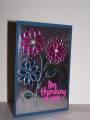
-I first die cut the circle; the die cut was placed on the back of the panel so it would raise the edge for the step three.
-Die cut the snowflake pieces from glitter paper; assemble and attach the gem: I used Diamond Glaze to glue the two glitter papers together and attach the gem.
-Place the snowflake under the panel and secure a couple areas using Diamond Glaze.
-Apply glue to the back of the snowflake and attach the green which is just big enough to cover the opening; I attached it with single sided tape to the blue panel.
-Punch the pink snowflakes from glitter paper and glue to the card.
**The white glitter paper is from a recycled greeting card. The pink glitter paper is handmade by smearing a glue pad directly onto the paper, pouring on heat and stick, heat, then add the glitter. I didnÂ’t get good results from either of the products alone but since I have them both I combined them and found it works great.
THE PUNCHED ENVELOPE:
This is a handmade envelope which has narrow sides that fold in and the square style back folds up over the side flaps for gluing.
-Punch the snowflakes and depending on the punch it may require the side flap to be closed and a portion of it will be punched but wonÂ’t be seen once assembled.
-Stick clear packing tape to the inside of the envelope over the punched area so if you touch the snowflake from the envelope frontÂ…itÂ’s sticky!
-Pour the glitter over the sticky and itÂ’s gone.
-Assemble the envelope, when ready to mail I use tacky glue to close it – for those cards I give away or donate I attach a strip of paper backed tape to the flap’s edge for the sender to peel and stick closed.
Date: Tuesday, September 29, 2009 GMT Views: 1118
Favorited:4