I used the weathered stamp on the tree branches in case you were wondering where the stamping was done! lol
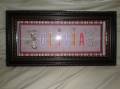
I punched the letters and glued them to the cardstock. After, I topped them with Crystal Effects. The empty spot is for baby's picture, but you probably already knew that!
Date: Monday, September 28, 2009 GMT Views: 1577
Favorited:8
Paper: Bashful Blue, Certainly Celery, Pretty in Pink, Barely Banana, Very Vanilla, Basic Black, Creamy Caramel
Ink: Close to Cocoa, Tim Holtz Distress Ink Tea Dye
Accessories: Ribbon, Alphabet Punch, Sizzix Branch & Leaf Die Cut, Crystal Effects, Butterfly Punch, 1/2" Circle Punch, Black Marker, White Gel Pen, Dimensionals
Registered: January 9, 2005 Location: Oh, Canada! Posts: 986
Sun, Jul 11, 2010 @ 11:16 PM
Jodi, I took Very Vanilla CS and crumpled it. I used Tim Holtz Distress Ink (Tea Dye) and did the direct to paper inking. I have never had a pattern for this ~ just eye balled it. I tear the body and neck as one piece. I tear a circle out of the same paper for the head. The brown is Creamy Caramel (so sad to see it go as I'm not sure the other browns are 'right') and I use to for the mouth, ears and horns(?). I think it is really important to sponge all of the edges. I used Close to Cocoa. The eyes are made with the horizontal slit punch and the whites are with a gel pen. I glue the head together and then decide where I want it on the body so you can angle it looking up or down ~ then you know where to draw the mouth. I have put dimensionals under the body and double thickness under the head. I think that is it! Thanks for your kind comment!
------------------------------ Shirley
I'm not a complete idiot ~ some of my parts are missing!