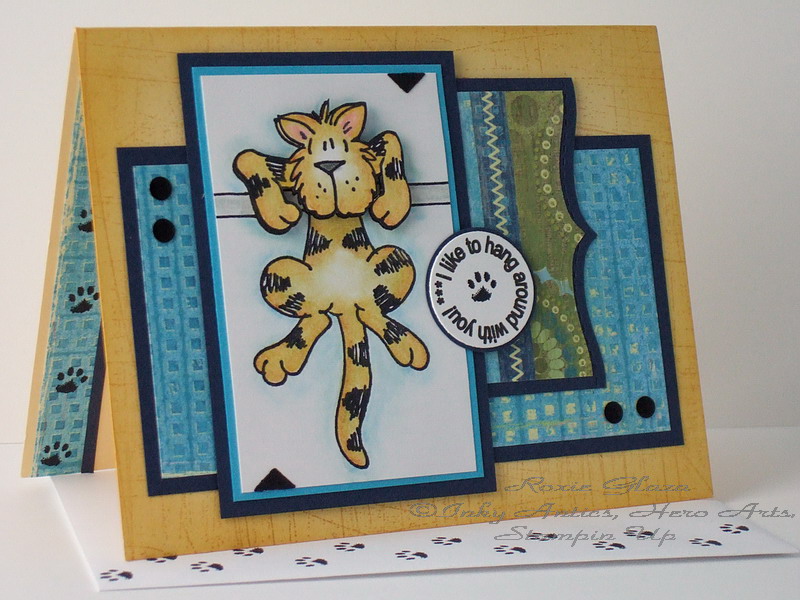
Measurements: turquoise – 2 ½ x 4 ¾” - 1/8” border, Top Note side cut panel – 1 ½ x 2 1/2” - 1/8” border, image panel 2 1/8 x 3 3/8” - 1/16 and 1/8” borders
Borders are not included in the panel measurement.
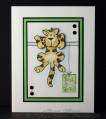
I couldnÂ’t decide what I wanted to work with for this layout so about 5:30 I decided I would use the same image I used for the C-A-S challenge Monday since he was already out and is such fun to play with.
-The image is colored with Prismacolor pencils, baby oil and paper stumps and I substitute the oil for Gamsol. Find the technique in the resources forum here at SCS.
-The blue shadow around the kitty is done with chalks and blender pen for getting in close and sealing the chalk.
-The nail heads are attached with Diamond Glaze which is similar to Stampin Ups Crystal Effects.
-The tabs on the image panel are the negative portion of a Cuttlebug border die cut. They are glued to the card.
-The kittyÂ’s head and arms are cut out and popped up with foam tape.
-The base is ink distressed on the edges.
-The Stampin Up Top Note die cut was used for the shaped panel. I cut it with the Cuttlebug using two B plates and nothing else.
-How I cut my circles using a 1” Cuttlebug die cut and 1 1/16” Marvy circle punch:
After printing the sentiment I punched it out with the Marvy punch so I could see where to place it on the die cut to get an even border around the wording. To make it smaller, I carefully placed it on the Cuttlebug die cut and ran it through the machine to trim off 1/16”. The two tools work great together but if you know of a perfect 1” punch, let me know please!
-The sentiment is computer generated.
How to print in a circle using Microsoft Word:
Click on INSERT
Click on PICTURE
Click on WordArt and a dialog box will appear
Choose a style of word from the chart and click on it then click on OK.
Type in your sentiment/message and also change the font style and size before clicking on ok.
Your outlined words will appear in your document
Highlight the message and the dialog box will pop up on the screen.
Click on abc (very small) three icons to the right of Edit Text and choose your shape.
Click on the paint bucket/brush two icons right of Edit Text to choose your text colors.
Before closing the box click on size and change the size to the same numbers in each box to get a circle to appear when you click ok. .75 worked well for my 1” circle.
Date: Tuesday, September 8, 2009 GMT Views: 3084
Favorited:35
Accessories: Prismacolor pencils, baby oil, paper stumps, sponge, brayer for inking up the background, computer, foam tape, nail heads, Diamond Glaze, tacky glue, chalks, Stampin Up – Top Note die cut, Cuttlebug
Registered: December 16, 2008 Location: Woodinville, Washington Posts: 11566
Tue, Sep 08, 2009 @ 9:20 PM
I love the papers, the layout and the image - really perfect friendly card that would make anyone smile! Coloring is beautiful (love the light border around the image) TFS
Registered: March 11, 2008 Location: Sacramento, California Posts: 39766
Tue, Sep 08, 2009 @ 9:44 PM
This is just the cutest image ever! I love this layout. Your colors are wonderful. That sanded bg looks like wood. What an awesome card. Hope I get to play. TFS :0)
------------------------------ Cathy B aka: Mutnik ....or is it Nutmeg?! I get so confused!
Smile.......people will wonder what you are up to! :0) Proud Fan Club Member 2010 DT forRubbernecker Stamps My Gallery