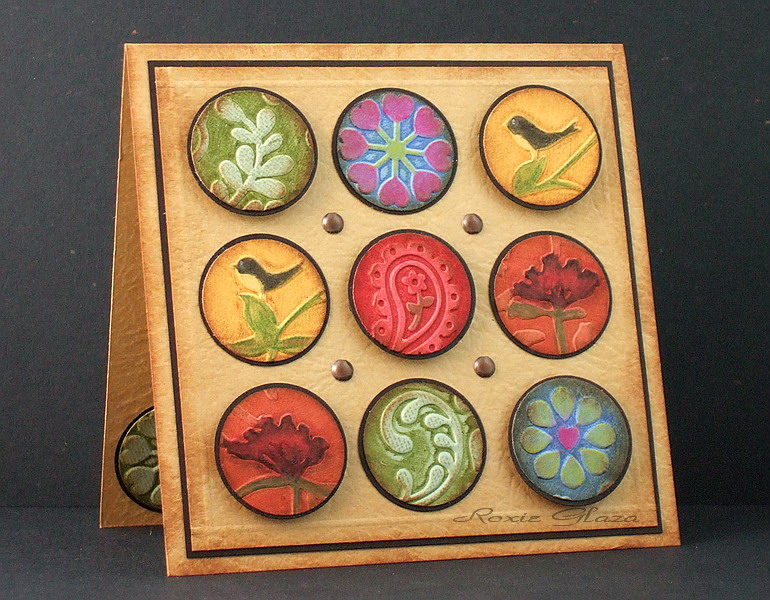
-The card size is 4.25" square.
-The black border panel is 4" square.
-The white panel under the circles is 3 15/16" square.
-The black trim on the circles are cut punched with a Marvy 1 1/16” punch (which is sold as a 1").
-The colored circles are cut with a 1” Cuttlebug die cut.
-I used the negative emboss technique (TLC160) on the Cuttlebug embossing then added color with Prismacolor pencils and ink distressed the edges.
- -Tacky glue and tape was used to assemble the card.
-I embossed the lines with the Scor-Pal
-I used the following embossing folders: Floral Fantasy, Perfectly Paisley, Birds and Swirls, Floral Screen
-The center and corner circles are popped up with foam circles.
Date: Tuesday, June 30, 2009 GMT Views: 9542
Favorited:202
Registered: June 9, 2006 Location: Wauconda, IL Posts: 55667
Wed, Jul 01, 2009 @ 11:15 AM
Well, you know I loved this so much that I had to come back and comment again. Somehow the first comment didn't stick - too many people trying to comment. This is my favorite with that leather like bg. Each button is done with it's own beautiful uniqueness. I love the 3D effect you gave with them too. You did a knock out job on this!!!