Here is my entry for this week's MFT Idol competition. This week's challenge was to make a one-layer card (insert blood-curdling scream here).
Um...do you know me? Have you ever known me to make a one-layer card? Doubtful. I'm trying to think of one right now and am not coming up with anything. I like dimension and I like layers. And I REALLY like designer patterned paper. One-layer is counter-intuitive to me.
I figured I could pretty easily just stamp something on a card front, but that's not exactly idol-worthy, right? Idol contestants are supposed to amaze and inspire, right? Well, I gave myself a good half hour to try to think of something special to do, and here's what I came up with.
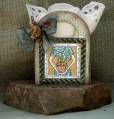
To make this card, I stamped the image in brown ink on thick rough-textured stock. I then chalked the image and embroidered around the edges with embossing floss that coordinated with my chalking. Then, I inked the edges of the stock to vintage it up a bit. I also inked up some lace to match the stock. The lace was originally white with a white satin ribbon weaved through it. I exchanged the satin ribbon for a more fun, better-matching ribbon and attached it to my card. Finally, I fashioned a hat pin out of a standard corsage pin (with it's head snipped off) and some jewelry-making beads I had lying around.
Now, I know what you're thinking... "That must look like crud on the inside!" Right? Nope. If you're *very* careful, it looks almost as pretty on the inside as the outside (minus a few knotted ends). They say the proof is in the pudding... You can see a close-up of the inside on my blog (link at the bottom of this post).
Supplies:
Stamps: MFT's "Happy Mother's Day"
Papers: Paper Source's "Creme-Luxe"
Inks: Memento Brown, Colorbox's Copper and Taupe
Accessories: Embroidery Floss, Chalks, Lace, Blue Ribbon by Basic Grey, Corsage Pin, Beads
Now, I won't fool you and say that this was easy or quick to make. It's actually more time consuming and difficult than it probably looks (especially since I was trying to make the back look as perfect as possible). And, I'll warn you that it's hard on the wrists! I have been struggling with with an arthritis-like pain in my wrist, and this definitely flared that up. But, if you would like to learn how to do this, despite all my disclaimers (and would like to get some helpful tips), I'll be posting a tutorial on my blog tomorrow, along with another card using the same technique.
In the meantime, will you please (pretty please with a cupcake on top?) consider voting for me? The vote opens tonight (Tuesday) at 10 pm EST and continues for 24 hours until tomorrow night (Wednesday) at 10 pm EST. I could really use your support!
Registered: February 7, 2007 Location: Alberta, Canada Posts: 13937
Tue, Apr 21, 2009 @ 6:51 AM
Well I think it's safe to say you accomplished what you set out to do...amaze and inspire!!! This is a FANTASTIC one layer card....way to go...AGAIN!!!!