This week's challenge was to use masking. I actually used masking on my very first MFT Idol challenge card, and it was fun to dig in to it again. I like dimension so much on my cards that I rarely use traditional masking. But I do use my version of masking a couple times a week. That version is to ink up your whole stamp and then to apply tape over the part you don't want to stamp on your page. I use it most often if I have a sentiment that is too long for a space, and I want to stamp it on multiple lines (like to fit in an oval, like I did on the seed packet above, for instance).
I should have been nice to myself and picked something easier, but I'm kind of a masochist when it comes to stamping. So I picked a VERY intricate set of stamps and made quite the complex design. And then I did it over and over and over again.
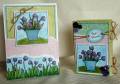
If you notice, the pots of tulips look slightly different on the seed packet and the matching card. Since everything's hand-masked, you get a little bit of variation in your images!
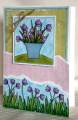
I made this seed packet holder using a very modified version of the Papertrey Ink Recipe Wrap-up template. I modified the template to fit my seed packets, making it wider and shorter, but you can download the original (for free!) here: http://www.papertreyink.com/mtt_reci...p_webview.html
I don't know if you can tell, but that was a LOT of masking! ;) When my husband saw what I was doing at the start of my project, he said I was crazy. And that was before he realized I was going to be masking pages and pages of tulip fields. But I actually love masking, because of the versatility it gives you with your images. I bought an Easter set, a scarecrow set and was gifted a vase stamp by Kim, and I get a field of tulips and a pot of tulips to match for free (minus a little labor, of course!)!
To make the pot, I first stamped the pot in cyan ink and outlined it with a black felt-tip pen, for a little definition. Then I masked the pot and inked up some tulips, taping over the leaves with masking tape, so that only the heads and stems would stamp. Then I stamped them and extended their stems, as needed with the felt-tip pen. Then I masked the tulip heads and stamped the "grass." Then I masked the tulip heads and the grass to stamp some taller tulips.
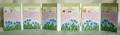
To make the field, I started out by stamping grass with the larger hay stamp. Then I masked over individual tufts and added in the smaller hay stamp. Then I masked over both hay portions and again inked up my tulips and taped over the leaves before stamping them. I again extended the stems as needed with a felt-tip pen.
Supplies:
Stamps: MFT "Egg-stra Special Easter," MFT "We're Not Scared," MFT "Build a Bouquet," MFT "Essential Sentiments"
Papers: Papertrey Ink's White, DP by MFT and The Paperloft
Inks: Memento Black, Colorbox Cyan
Accessories: Oval and Scallop Oval Nestabilities, Copic Markers, Chalks, Twine, Buttons by Oriental Trading Co., Sewing Machine, Pop Dots, Timeless Template by Papertrey Ink
I hope you enjoyed this little spring-y project. If you did, please VOTE (for me!) tonight!
PLEASE visit my blog for lots more pictures, close-ups and details. There's also a picture there of what all the stamps looked like individually before they were masked: http://kathy-prettyinink.blogspot.co...ol-week-2
Date: Tuesday, March 24, 2009 GMT Views: 899
Favorited:10
Registered: March 24, 2006 Location: Deep in the Heart of TEXAS Posts: 15980
Tue, Mar 24, 2009 @ 10:21 AM
Looks like a lot of work, but well worth it. Beautiful!!
------------------------------ Phyllis Young at heart, slightly older in other parts. We really never grow up, we just learn how to act in public!! What if you woke up today with only what you had thanked God for yesterday??
Registered: January 14, 2008 Location: Northern part of San Diego, CA Posts: 3541
Tue, Mar 24, 2009 @ 4:10 PM
Great job Kathy! I must have taken a long time to mask all the flowers. I love the colors you used, the way you tore your paper, and your sewing is just perfect!


 So I picked a VERY intricate set of stamps and made quite the complex design. And then I did it over and over and over again.