Whew! What a night. It's Spring Break here and the boys wanted to spend the night in the tent. It was a cold night, but it didn't last long. They had their cots where I had just 4 blankets to sleep on. Doesn't quite work well with a herinated disc in your back. But I did the best I could. Yes, I am sore today. Part of the fun.
I didn't get to play the challenge yesterday with the ribbon, as we were out all day looking through muesums...lots of walking. Anyhow, I wanted to play today. My dh is off.
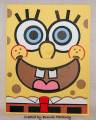
Here is the story: It's time consuming but fun to make. The color challenge today was to use red, kraft, summer sun, and black. I started out using yellow c/s as the base card. I took another piece of yellow c/s, trimmed to fit the card, and used my CB Bubbles folder. I wanted the bubbles the opposite way, so I flipped the folder over to get the spongy look. I used tacky tape to secure it to the base of the card. Then the creating part comes. I used my CM oval cutting system for the mouth and cut twice with different a red and green blade. I moved the green blade up so I can get the same curve of the mouth for the black and brown parts. I also used my CB heart die cuts for the mouth but just trimmed off what I needed and trimmed to make the shape of the mouth. I cut 2 small white pieces of c/s for the teeth, along with some black background c/s. The cheeks gave me the biggest problem. I used my CM circle punches, ran it through the CB bubble folder, and used my red sharpie for the dots. I hand drew the mouth side. I had drew the nose and cut to fit. Also ran through the CB bubble folder. The eyes are all cut out with the CM circle punches. The eyebrows are held on using a thin piece of tacky tape. I used my decorative scissors to get the wavy part of his shirt on the bottom twice for each color. I used a separate piece of black and copper color c/s for the bottom of his shirt. The tie is just a little different than the original design due to the shape of the scissors but I think it came out cute. I then cut 4 little black squares to add to his shirt. I also used my small hole punch for the bigger dots on his face along with a regular hole punch (office kind) for the other dots. After everything was mounted, I went back over the light red circle of the cheeks with a red sharpie. I hope you like it. TFL! Have a wonderful day.
I made this for a little girl who loves Spongebob.
Bonnie
Date: Tuesday, March 17, 2009 GMT Views: 2137
Favorited:19
Registered: April 22, 2006 Location: SCS in NC Posts: 20914
Tue, Mar 17, 2009 @ 10:11 AM
This is adorable. What a great way to use the yellow. I think he turned out great. What a mom. We had so much rain we couldn't camp out if we wanted to. Super job.
------------------------------ Dawn B. Anything is possible when you open your heart.... My BLOG
Registered: August 8, 2006 Location: Roseville CA Posts: 18519
Tue, Mar 17, 2009 @ 10:42 AM
this is so clever, wonderful, perfect. i LOVE this! great job on the circles on the mouth. the bubbles are perfect. the sweet tongue with the heart. this is just great great great. thanks for sharing!
Registered: May 29, 2006 Location: Eminence, Indiana Posts: 29587
Tue, Mar 17, 2009 @ 11:07 AM
Oh, Bonnie! How did you know I love Spongebob?! Oh wait, you said a 'little' girl...dang, that's not me! lol! Anyhoo...I think this is totally stinkin' fantastic!!!! I just love a gal who knows how to improvise!!! Hey, I need to make a Thomas-the-Train card....any pointers?