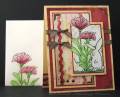
I chose this photo to play from, I saw the red flower and started searching for paper and came up with this DaisyDÂ’s coordinating pieces.
-Prismacolor pencils, baby oil and paper stumps for coloring the image.
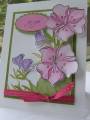
-The ribbon is tied first then one end taped under the image panel, wrapped around the inside of the card and taped to again where I taped the first end.
-Iron eagle punch was used for the corner features.
- Sponging was done with a sea sponge on the yellow and image panel to coordinate with the designer paper.
-Image is mounted on foam tape.
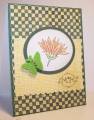
-My out of the box images are cut this way: I hold the image panel to a light source and make a mark on the backside to show the image location which will be in my line of cutting. I cut to the image on the front with my paper cutter, flip it over and cut to the mark on the back then cut out the image with scissors. I have a guillotine style cutter.
When cutting between images such as the bunny ears and tail, I use a straight line Coluzzle template and craft knife.
Tip on coloring the envelope: If it's a ready made envelope it's best to put a piece of cardstock inside before coloring to keep the surface smooth.
If you make your own envelope a piece of double sided tape that needs the backing peeled off will be great if your giving as a gift to use at a later date. If I'm mailing it, I just glue it shut!
Registered: March 5, 2007 Location: Coatesville, Pennsylvania Posts: 44975
Sat, Mar 14, 2009 @ 6:07 PM
Beautiful!!!!!!!!
------------------------------ Lesley Proud Fan Club and RAK Member He is the GOD of the Impossible!!!! Kookzi the Rookzie Punchkateer It is by the grace of God that we take our next breath.
Registered: March 21, 2006 Location: sunny southern california Posts: 20098
Sat, Mar 14, 2009 @ 7:24 PM
What simple and sweet bunny image. Love it paired with the out of the box florals!
------------------------------ christine m.aka summer and weekend stalker DOT INK (My yadda yadda) Don't magnify your problem . . .Magnify your God
PROUD MEMBER OF THE REDDIVAS!