Today, I am sharing a very cute and whimsical kitchen stamp set, called "Kithen Clutter by Clear Dollar Stamps, to be released on March 1st. This set has several images including, a tea kettle, sugar and creamer, dish soap, bubbles, sponge, coffee pot, cannister jars and more! This set is so much fun to stamp with with endless possibilities for stamping and much more fun than cooking!
INSTRUCTIONS:
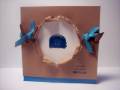
A 5"x 10" card base was cut from Paper Trey White Cardstock and set aside. Three square mats were cut to size: Plaid 5", Burgundy 4-3/8", Floral Print 4-1/8". A yellow horizontal strip was cut to 4-1/8" wide x 1-1/8" high, and a brown border was cut to 4-1/8" wide x 1-5/16" high. Using a Marvy Corner Rounder Punch, I clipped the bottom left and right corners of all 3 mats. Using a Cuttlebug and the Swiss Dots Embossing Folder, I embossed the yellow horizontal strip. Using a Stampin' Up! Slot punch and after marking the center of the brown horizontal strip, I starting punching from the center outward, first to the right and then to the left so that the scallops on the border were be balanced and centered. I paper pierced 3 decorative holes in each of the brown scallop points. I glued the plaid, the burgundyand floral mats together, and then glued the yellow horizontal swiss dot embossed strip along with the brown horizontal scalloped border together and then on top of the 3 glued mats. Using my Janome Hello Kitty Sewing Machine ; ) I machine stitched around the 4 sides of the larger, plaid mat and the floral mat with the yellow horizontal strip at the bottom.
The sentiment was stamped onto Paper Trey White Cardstock using Memento Tuxedo Black Ink. Using a Marvy 1.5" circle punch I punched out the sentiment, cutting it about 3'4 from the top of the circle, horizontally. Using a paper piercing tool, I hand pierced around the semi circle sentiment mat, and then, using Stampin' Up! Apricot Appeal ink, I lightly sponged around the semi-circle and then again, a little more heavily using Stampin' Up! Only Orange. I glued the sentiment to the yellow horizontal swiss dot embossed strip. The stamped focal image, the toaster was stamped onto Swarthmore Watercolor Paper, and colored with Copic Sketch markers and blended. Using Nestabilities Regular Round Die, I cut out the stamped image, and then using a paper piericng tool, I hand pierced around the circular focal image. I cut a pinked circle burgundy mat for the stamped image using the Nestabilities Large Pinking Circle Die Set. I added Crystal Effects to the toaster to add dimension and interest to the toaster. I glued the stamped toaster image to the burgundy pinked mat and set aside.
Using Offran Brown 5/8" wide Satin Ribbon, I glued down a ribbon strip veritcally down the right side of the card, anchoring it to the back of the largest mat. I "v-eed" the end of the ribbon by folding the ribbon in half, and cutting a slant cut from the folded edge outward. I popped up the matted, stamped toaster image overtop the Offray Brown Satin Ribbon strip, and then added two bow knots to the ribbon strip above the stamped image. Using thread, I anchored sewed the three button embellishments and then adhered them to the card front using Zots. To finish, I added Kaisercraft Self-Adhesive "Bliss" Pearls to the flower centers of the floral print interior mat. The card was finished off by gluging the card front to the 5"x 10" white cardstock card base.
Date: Wednesday, February 25, 2009 GMT Views: 387
Favorited:6
Paper: Bazill Solid Cardstocks, My Minds Eye "My Sunshine Sunny Days" & "My Sunshine Blooming Lovely", Paper Trey White Cardstock, Swarthmore Watercolor Paper
Ink: Memento Tuxedo Black, Stampin' Up! Apricot Appeal and Only Orange Inks
Registered: February 1, 2005 Location: Temple, Tx Posts: 37720
Wed, Feb 25, 2009 @ 3:06 PM
This is sooo beautiful, Linda....I love the paper, colors, sewing, buttons, ribbons, and that super awesome toaster image!!!! It looks fabulous with the CE and matted on the Nesties layers....such an amazing design!!!
Registered: June 21, 2006 Location: Still getting giddy over paper and ink in Colorful Colorado! Posts: 14180
Wed, Feb 25, 2009 @ 4:14 PM
Oh, I really like your layout for this little toaster! The colors are so well coordinated with the designer paper, and the details as usual puts this card above the rest! Just wonderful all the way around, Linda!!
Registered: March 11, 2008 Location: Sacramento, California Posts: 39766
Thu, Feb 26, 2009 @ 8:14 AM
Another very cute card! Love this shiny toaster! Love your dp, buttons and stitching. WOW again!!! TFS :0)
------------------------------ Cathy B aka: Mutnik ....or is it Nutmeg?! I get so confused!
Smile.......people will wonder what you are up to! :0) Proud Fan Club Member 2010 DT forRubbernecker Stamps My Gallery