Hello everyone! This is my second attempt to upload this... SCS stole the first one! LOL!
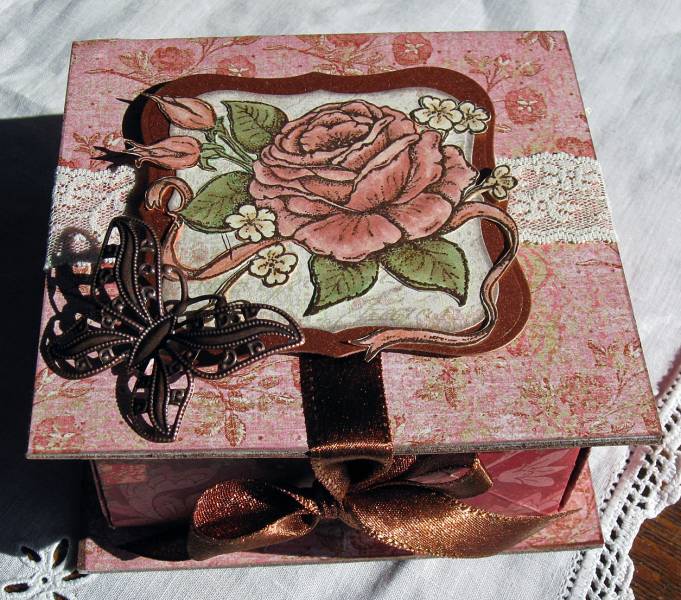
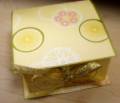
Today's Technique Lover's Challenge was this fun Origami box. While it was not hard to make, there were a few folds I just had to figure out from the diagram... not specifically labeled as "fold". Once I figured that out it went easy. I made one other poor judgement call.... Lynn had specified to use a "light weight" piece of cardboard/chipboard, and mine was quite heavy. The positive side of that is that this box is quite sturdy, but the down side was that the piece of paper that wraps around the OUTSIDE of the fold actually needed to be a tad longer than the one on the inside of the fold, to compensate for wrapping around the thickness of the cardboard. I would suggest checking the thickness of your cardboard and the fold before cutting that second piece of dp.
So... that said, which was merely things I learned that I hope might help you if you are making this, here is what I did:
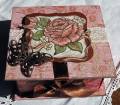
I used K&Co DP (double sided) and my Inkadinkado Rose image. I heat embossed the rose with copper ep, colored it with copics, cut it out. Used my nestie Label One to cut a layer of copper and one of a script dp from the same book of dp. I antiqued the edges of that layer with my Ink it Up Copper ink direct to edge and outter top areas to add depth. Mounted rose image with glue. I used old lace wrapped around the box and tied it in a big pretty bow on the inside of the lid. That is the only decoration I did to the inside... the dp is pretty and the bow pretty much fills the top.
I used sparkly copper ribbon added with tacky strip to the top and bottom to tie the box closed. I added an Antique Copper Butterfly I had picked up in the jewelry dept. at HL.
Fun and really pretty project today... thanks Lynn. I love the way this turned out!
Thanks for looking! Have a great day!
Date: Monday, January 12, 2009 GMT Views: 1304
Favorited:14
Registered: July 29, 2007 Location: Connecticut Posts: 13243
Mon, Jan 12, 2009 @ 9:20 AM
Grace, this is gorgeous! I just don't have time to play this challenge, but you did a fab job!! Love the butterfly! Awesome! I'm on lunch from my extern site. I'm loving every minute of it!!!
Registered: March 11, 2007 Location: In my Garden in West Jefferson, Ohio Posts: 4278
Mon, Jan 12, 2009 @ 9:21 AM
OMG.........................how absolutely gorgeous.........this one is going to my favs !!!!
That thicker cardboard in your lid sandwich makes this a much sturdier box. Paper and rose....so beautiful.
I hope whomever gets this box appreciates it !!!
TFS
------------------------------
GardenDiva AKA Tina DeLong
FS363 QFTD182
Fan Club Member & Tuesday Teapotter Hostess MMTPT222
Thyme began in a Garden. Jeremiah 29:11
Registered: April 6, 2005 Location: Stuarts Draft, Virginia Posts: 14401
Mon, Jan 12, 2009 @ 9:28 AM
This is incredible, Grace!!! So stunning and so beautiful!!
------------------------------
Wanda Cullen ~ Dirty Dozen Alumni, On design team for Papertrey Ink, Designer for Color Throwdown and Fusion Card Challenges Cullen-ary Creations[/URL]...my blogHERE'S MY GALLERY[/URL]
Splitcoast Dirty Dozen Alumni SCS Gallery Moderator Splitcoast Challenge Hostess Teapot Tuesday TEAm
Registered: July 27, 2007 Location: Dublin, Ireland Posts: 131390
Mon, Jan 12, 2009 @ 9:34 AM
This sort of shabby vintage isn't quite my style, but I do think this is just lovely - there's such a great old-fashioned garden feel, I can almost smell a lovely moss-rose - even though it's a regular rose you stamped . And the butterfly is the crowning touch.
My card was a bit thick too, wish I'd thought of a cereal box as someone else did. But by the time I'd trimmed it down, which I wanted anyway, the paper strip was still long enough - just - to wrap over the sides, mitre the corners and stick the second piece over so it was fully covered. Now, thin board would have made all that unnecessary in the first place, But we did get nice sturdy boxes, didn't we!


 . And the butterfly is the crowning touch.