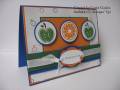
I wanted to see what it would look like to heat emboss on acetate. I learned that it takes very steady hands and a lot of patience. It is hard to tell in the photo, but the acetate covers the 4 small squares, and the image was stamped on the acetate with SU White Craft Ink and SU White EP. I adhered the acetate piece by punching a 1/6" hole in the center of the image and white card stock under the small squares. I have seen the full acetate cards, but wanted to see how it would look with just a part of the card having acetate on it. See supplies below.