I taught my Stamper's Club Girls how to make this really neat fold down book last fall in Stampers Class. I wish I had the one I put all the pictures in for you to see, but I gave it away. You can put pictures on all the parts that are not stamped on or have patterned Paper. I added 5 pictures of this to the gallery, because you really have to see all the parts of it to make sense!
You really have to see a picture tutorial for it to make sense so I will leave a few deets here, but the full Tutorial and all the details and pictures are on my blog.
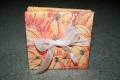
You take 2 pieces of cut down to 4 1/2" x 4 1/2" foam board. (I got mine at Hobby Lobby)
2 pieces of 4 3/4" x 4 3/4" Patterned Paper I used two different prints one for the front one for the back. Glue them on and fold edges in and glue. They will be covered with the book pages.
Take either 5 or 7 pieces of CS for the book pages. It has to be an odd number or they do not fold together well. I did a 9 page book but that gets pretty long.
Fold in half one way, in half the other way, then on diagonal. Glue pages together and then onto covers and you have your book, but like I said it really takes a Picture tutorial to explain it very well!
I stamp on one of the 4 triangles and put the PP on one of the 4 triangels. I put pictures on all the rest of the pieces.
I made a book with Pictures from the last 5 Fall/Halloween/Pumpkin Patch pictures for my Mother in Law.
Thanks for Looking I hope you enjoy it let me know what you think! Look at the other pictures of it to make more sense to you! :-)
Heather
Date: Friday, November 7, 2008 GMT Views: 260
Favorited:2