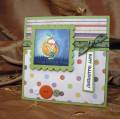
These all came in the Paper Garden Projects "Happy Halloweenie!" kit:
Stamps: The sweet 'Peter Pumpkin' stamp
Cardstock:
* GreenTextured cardstock (measuring 11 x 5 1/2 inch folded in half to make a 5 1/2 inch square card)
* 1 strip of Green textured cardstock (5 1/2 inch x 3/4 inch)
* White cardstock (for main image: 2 2/8 inch square; 3 by 1 inch piece (for sentiment)
* Green Textured cardstock (3 inch square scalloped for the mat; 3 by 1 inch to make sentiment)
* 5 1/2 by 2 inches of Pixie Sticks (Striped) double-sided patterned paper
* 5 1/2 by 3 1/2 inches of Pixie Sticks (Dotted) double-sided patterned paper
* Onyx Black Versafine Ink Pad
* Watercolour pencils & Niji watercolour brush or Inks, markers, other colouring medium
* Sakura Star dust Gelly Roll Pen
* Crystal Lacquer, Oh so sticky tape, foam mounting tape, (and/or other adhesives)
* Silver cording
* black marker
Step 1. Stamp Peter Pumpkin in Onyx Black Versafine Ink Pad. Colour him with Watercolour pencils & Niji watercolour brush or Inks, markers, other colouring medium. Add glittery details with a Sakura Star dust Gelly Roll Pen.
Step 2. Edge the image with a black marker to define it.
Step 3. Create the scallop on the green mat with Nestabilities scallop square or a threading --water border punch. Mount the image on the scallop square.
The Details:
Step 1. Cut the patterned paper pieces:
Step 2.Edge the patterned pieces in black marker. Adhere them to the Card.
Step 3. Adhere the double-sided ribbon to the strip of Green textured cardstock (5 1/2 inch x 3/4 inch)--tying a bow in it & sticking it down with Oh so sticky tape.
Step 4. Adhere the mat & image with foam mounting tape.
The Sentiment:
Step 1. Stamp/emboss "Happy Halloweenie" onto white cardstock.
Step 2. Cut in a random shape
Step 3. Stick onto Green textured cardstock & cut out in the same shape to make a mat.
Step 4. Detail with a Sakura Star dust Gelly Roll Pen.
Step 5. Punch a hole in the top & thread on with silver cording.
Finish with three opaque buttons (white, orange, & green.) Adhere them with Crystal Lacquer
Thanks for lookin'
:O)
mel
Date: Monday, October 27, 2008 GMT Views: 519
Favorited:5