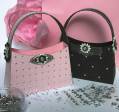
I just love love LOVE the flourish from the Little Paper Shop set {Flourished Dove} so i made a curvy basket box to show it off. (It's a straight flourish, but you can curve it how you like since it's acrylic.) You can see the set here if you're curious:
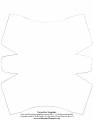
The template that came about has the same curved front, but it has straight-edged sides...so that the angle is different...making the stamping on the front visible.
For those of you who prefer not to read blogs, here's the details & how i made it:
When finished, the basket-box measures 4 2/8 by 2 7/8 inches at the bottom & 6 1/2 by 3 3/4 at the top. To make it sturdy, I've glued patterned paper to cardstock (details on how to do that below.) You could just use heavy cardstock if you like. :O)
Step 1) Print the rounded basket box template onto patterned paper or cardstock.
Please Note: the template I made will look slightly different than the one in these pictures; the front & back are curved, but the smaller sides of it are straight.)
Step 2) Roughly cut the template
(leaving about 1/8 or 2/8 of an inch excess around the template line.)
Step 3) Spread the back side of the template with glue. I've used Tombow Monomulti adhesive. It's my new fave; it really sticks! (I used double-sided paper: Cosmo Cricket Fleuriste:Flora Bella from my sweet friend Kim)
Step 4) Stick the gluey template onto cardstock.
This is to make it thicker and sturdier like 4 ply card.(I've used Stampin' Up!s Vanilla Textured cardstock from the neutral pack; I stuck it on the non-textured side so the texture would show.)
Step 5) Cut through both layers
(cardstock & patterned paper) using the line of the template.
Step 6) Stamp where you like. I can't get enough of the stunning flourish stamp from Little Paper Shop's {Flourished Dove} You can line the flourish up with any curve. Here's how:
1. Lay an acrylic block over the curve you'd like to match
2. Arrange the Flourished Dove stamp using that curve as a guide
3. Stamp away
This is stamped in Black Craft ink & clear embossing powder. You can use the {Flourished Dove} flourish straight too...for the smaller sides (which are straight on the template.)
Step 7) Score 4 lines from the corners & fold the score lines
(the scoring is indicated on the Score Gide PDF by dotted lines
Step Embellish however you like. I did this schtuff:
* lined the inside with matching paper (4 2/8 by 2 7/8 inches)
* stitched around the lining (gluing the thread ends under the liner
* pierced & stitched the sides with black thread
* embellished as I stitched with seed beads (inside the basket and out)
* added self-adhesive gems to the flourish
Step 9) Punch holes where indicated or where you like
(you could punch several holes & lace 'em up the sides!) :O) Add eyelets if you'd like to make it stronger. Use 4 pieces of ribbon, wire, or whatever you like to tie it together.
Step 10) Add feet if you like. I've glued on 4 large glass beads for feet & that's it!
Whew! That's a lot hey? Thanks for lookin'
:O)
Mel
Date: Monday, October 27, 2008 GMT Views: 3584
Favorited:17
Stamps: Flourished Dove by LPS : little paper shop & their Butterflies & Blossoms
Paper: Cosmo Cricket Fleuriste:Flora Bella, vanilla textured cardstock (SU neutral variety package.) Brown paper
Ink: Black craft ink & clear e.p.
Accessories: Tombow Monomulti adhesive, silver & clear seed beads, black thread, needle, paper piercer, Feet: 4 large glass beads, black eyelets, black vintage seam binding to tie shut, embossing powder,
Registered: April 9, 2006 Location: Lee's Summit, Mo. Posts: 2176
Tue, Nov 18, 2008 @ 2:15 AM
Just wanted you to know, I used your template for a raffle. It was the perfect size for a stamp pad, a few markers and a few 3 x 3 notes. It was so simple and it really looked pretty. I just glued DP to the cardboard in our DP and it was very sturdy.


 Embellish however you like. I did this schtuff: