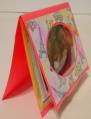
This is an idea I got from DIY network Carol Duvall Show : Episode CDS-1506. It is a clear envelope photo album which I adjusted the size and made it out of a 12x12 cardstock sheet. It stands on it's own and has clear envelopes inside in which you can place photos. Finished size is 6x6". It was easy and fun to make! I have typed up the adjusted instructions and you can also see an example at: http://www.hgtv.com/hgtv/cr_paper_cr...216282,00.html
Date: Thursday, May 12, 2005 GMT Views: 1132
Favorited:9
Registered: February 18, 2004 Location: Central Florida Posts: 308
Thu, May 12, 2005 @ 10:13 AM
I saw this on hgtv too and couldn't wrap my mind around the instructions. You said you typed up an instruction sheet? I'd love to have it. Mind sharing? Thanks!
------------------------------ Shelly
Central Florida
Stamper, Scrapper, Knitter, Homeschooler, Mom and Wife... not necessarily in that order!!
Registered: March 9, 2004 Location: Utah Posts: 155
Thu, May 12, 2005 @ 2:23 PM
Here are the edited instructions:
Materials
*clear envelopes
*Sticky Strip
*Mono Adhesive
*bone folder
*Coluzzle oval and oval companion
*One 12 x 12 piece of cardstock:
~ 6 x 12" cardstock for card
~ 6" x 7" cardstock for cover
~ 6 x 3� cardstock for easel
*6 x 5 � � cardstock for mounting envelopes
*5 x 5 � � cardstock for top layer of cover
*Embellishments as desired
*6 � x 6 � Vellum Envelope
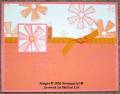
1. Using the three clear envelopes and a 6 x 5 � � piece of cardstock, tear off the self adhesive strip on the back of the envelopes. Place one by one them on top of the cardstock, folding each one over the top of the cardstock in a staggered position. Fold the piece of 6 x 12" cardstock in half and adhere the envelope layer to the card with sticky strip.
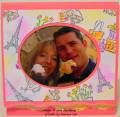
2. To create the cover: Cut an oval in the 5 � x 5 � � cardstock for top layer of cover . Mount onto 6" x 7" cardstock near the bottom edge. Cut companion oval. Embellish as desired.
Position cover on front of card by and fold over the top piece. Press fold with bone folder.
Adhere cover onto the base card with sticky strip on back fold.
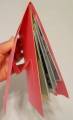
3. Score the 6 x 3� of cardstock every 1.5 inches and accordion fold to create the easel.
Adhere the easel inside the card at the bottom so that the album/card will stand on its own.
4. Fill the clear envelopes with your favorite photos. The album has the unique feature of resting on a table as you flip through the photographs.
Fits inside 6 � x 6 � Vellum Envelope.
Tip: Use this same technique of layering clear envelopes on scrapbook pages and inside a regular card.