I made this Project to teach my Stamper's Club this weekend.
I took a 4 1/4" X 11" piece of Kiwi Kiss CS scored it at the 5" and the 6" mark so it would fold down on both side in the middle.
I took my 1 1/4" Circle punch and punched out 2 Eyes on Whisper White CS (after using the Weathered Background stamp inked in Real Red to give the eyes a blood shot look.) I distressed the edges of the eyes in Old Olive ink. I stamped the Black Staz Oncircle in the middle with the solid circle from Simply Circles.
I took the Designer Lable Punch and Punched out the nose, and the two bolts coming out of the side of his head. I folded them all in half and sponged the nose piece with Old Olive ink to give the Nose Demension.
I took Perfect Plum CS 4 1/4" by 5" scored it at the 2" mark and the 3" mark so it would fold over the top of the flat head like the Kiwi Kiss paper did. On one side I jaggedly cut out hair, then sponged on Elegant Eggplant ink to give dimension again.
I punced out 2 1 1/4" circles in Kiwi Kiss and cut them like spirals to make the eyes pop out like springs (Booglie Eyes) I glued the eyes on one end of the spring and the other end to Frankie's face with glue dots.
I glued the nose on in between the eyes with my snail adhesive.
I glued the hair on with my snail, and Stampin Deminsionals so it would pop out from the face just a little.
I Drew on with my Black SU Marker the smile jagged, and the 3 scars and stitches.
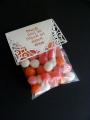
I used my snail and took a strip accross both inside bottom pieces of the face, then attatched the bag of candy inside in the appropriate place.
WaLa you have a Happy Frankin Candy Favor Bag to share!
Registered: February 13, 2005 Location: Posts: 290
Fri, Oct 03, 2008 @ 12:45 PM
This is so darn cute!
Wish your VERY CLEVER idea had shown up before my Kids Halloween Camp :-( This is going right into the favorite files for next year! The kids are going to LOVE it!