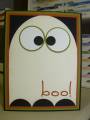
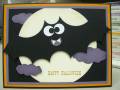
Here are the details on how I made the bat. I started with a 3” x 8 ½” strip of paper. I found the center and used the ¾” circle punch to create his ears. That gave me a center point to figure out where to put everything else. Then I used the 1 3/4” circle punch to shape the top of each of his wings. I used the punched out piece from the first one to get an idea of where to punch the second one so they would be the same size. I made sure I had it close enough to the ear to create the ear shape. Next I used the ¾” circle punch to create the center arch under where his mouth would be. After creating the arch in the center, I continued to use the ¾” circle punch to continue out his wing. I put the punch on the paper a little further up each time. After you punch the second arch on his wing, you will probably have to cut some of the extra paper so you can get your punch in far enough. Then I used my cutter to cut off the end of his wing. I lined it up with the end of the top of his wing and the end of the bottom of his wing. I used the cut off piece as a guide to cut the other side at the same angle. Watch the angle you cut because this is how wide your bat will be and you want to make sure he will fit on your project. I had to go back and cut a little more off each side to get him to fit on my card. Next I went back to the bottom center and used the 1” punch to up a little further to give his two wings more definition. His eyes are ½” circle punch and 1/4” circle punch. His mouth is ½” circle punch and then I punch the circle again to create the smile. I used the ½” circle punch to create his teeth. I just cut the circle in half and then cut that piece in half and in half again. It left the one edge rounded a little, so I cut it straight. Hope this isn’t too hard to follow.