I created this mat book for FridayÂ’s (August 29th) Challenge -- LSC183. Earlier in the week I came across an exquisite mat book created by Sereikastamper, which you can see HERE. I PMÂ’ed Keri and she graciously walked me through the process of making the book. When I saw the instructions for todayÂ’s challenge, I thought, what could be more perfect?!
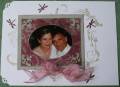
Some very dear friends of ours, Patrick and Lisa, got married on June 7th. They had a wedding photographer and videographer and I’m sure she’ll have a lovely wedding album. But I knew that Lisa would also love a handcrafted album. I took some wonderful pictures that day and I ordered prints of the ones I thought were best. I had originally planned to put them into a small (8 inch by 8 inch) scrap book album but I kept dragging my feet – obviously, I was waiting for this challenge, which gave me the idea for a lovely way to present the pictures to our friends.
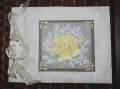
The something “old” is the paper that I used for the inside and outside covers – both the Victorian prints as well as the textured green that I used to mat the artwork. I think I’ve had it for at least 5 years! (I bought it because I just loved it and I knew I would use it “someday”.)
The something “new” are the stamps that I used for this project. I got them all within the past two weeks. The photographs are also “new”; they recently arrived from Snapfish.
The something “borrowed” is the idea - Keri’s book was the inspiration.
The something “blue” was actually the hardest part, since there was nothing “blue” about their wedding (except for the sky that day LOL). So I used blue and green to make the inscription on the front inside cover and the designer’s stamp that I put inside the back cover.
Some things about the book: I made it larger than KeriÂ’s book, so I had to experiment with ways to reinforce the front cover. I liked the way her cover folded over and I wanted to incorporate that feature. I was afraid that a single piece of cardstock wouldnÂ’t stand up to moderate gentle use and I also wanted to have a piece of ribbon inside the fold-over area.
I accomplished this by using a heavy piece of lightweight cardboard that I covered with the designer paper I wanted to use for the inside cover. I laid the pieces of the split front top cover onto the back cover to use it as a template and clipped them together with plastic clothes clips to make sure they lined up perfectly. I positioned and glued a piece of grosgrain ribbon in place. Then I attached the inside cover across both pieces of the top cover.
I stamped the rose, leaf cluster, flower sprig, and butterfly onto vellum with embossing ink and RangerÂ’s embossing powder in seafoam white. I layered and masked them and then colored them with water color pencil, leaving the sprigs as a delicate background. (Ironically, I just passed along an order for Stamping UpÂ’s beautiful layered rose stencil set to my friend Blaine, who is hosting a stamping event this month, but decided to just work with what I had here for this project. But that set would have been perfect for this!)
When I laid the artwork on the book to try and get a sense of how to mount it, I was struck by how the seafoam flower sprigs on the artwork looked so nice against the paper so I carried the design over to the paper and stamped over the patterned paper with the flower sprig and embossed with the seafoam white.
This project ended up being a “two-fer” – well, more like a seven-fer LOL. I incorporated Saturday’s, (August 30th) as well when I decorated the inside pages. Each of the inside pages is a double layer - two pages adhered back to back with eyelets where the ribbon runs through to bind the book. The pages I completed as a result of Saturday’s challenge can be seen here! Because some of the pages are very involved and three dimensional, I added spacers between many of them to provide room for bows and embellishments so the book would lie flat.
Things I would do differently: (1.) I should have made sure that the space between the two pieces of the front board was the full ¼ inch that Keri recommended. I used a corrugated cardboard and I didn’t take into consideration that it is much thicker and the space I ended up with (1/8 inch) really wasn’t enough. I had to “smash” that joint with my eyelet hammer and it shows. (2.) I should have chosen the ribbon more carefully. The ribbon I used for the ties is a plainb organza. I wish I had used the same ribbon that I ultimately used to bind the book. Organza wasn’t strong enough to bind a book this large. I used a wonderful wired ribbon that I had initially considered and dismissed. In retrospect, it made a much better choice, and is a much richer, elegant “fit” for the covers.
Date: Saturday, September 6, 2008 GMT Views: 760
Favorited:3
Registered: November 29, 2005 Location: In the State of Stamping.... or NC Posts: 15140
Sat, Sep 06, 2008 @ 12:49 PM
This looks beautiful! The patterns and ribbons look so elegant and the rose is lust lovely! What a wonderful creation for your friend to be able to treasure throughout the years to come!


 Jan
Jan


