Splitcoaststampers.com - the world's #1 papercrafting community
You're currently viewing Splitcoaststampers as a GUEST. We pride ourselves on being great hosts, but guests have limited access to some of our incredible artwork, our lively forums and other super cool features of the site! You can join our incredible papercrafting community at NO COST. So what are you waiting for?
TLC648 ~ Print or Stamp with Bubble Wrap ~ {07/24/2017}
It's Sabrina here - back from my holidays - thank you Karen for subbing for me last month. I'm looking forward to trying out your double stencil technique soon.
This certainly isn't a new technique, but I've been seeing it trending in uploads recently, and when I checked the TLC forum, it hasn't actually ever been featured before - so today we are going to pull out some bubble wrap and have fun stamping or printing with it. I had also noticed that it was one of the suggestions in the ideas leaflet that came with my Brushos, so here are a few options for you to make a choice from. Sorry if this is a picture-intense post, I thought they might be helpful. Feedback always welcome...
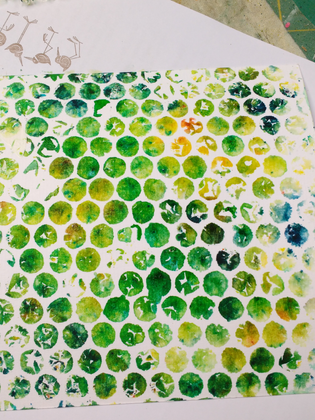
* Lay bubble-wrap bubble-side up on your protected work surface, and then sprinkle with some Brushos or other powdered colour. Mist with water, then press card down on top. I found I was able to get several good prints using this technique.
Sprinkle:
Spritz:
Print:
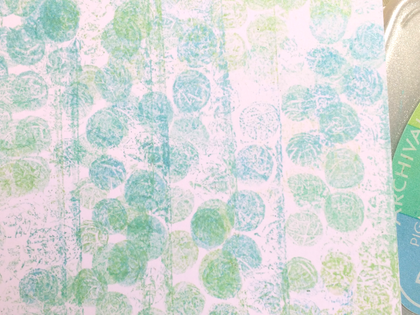
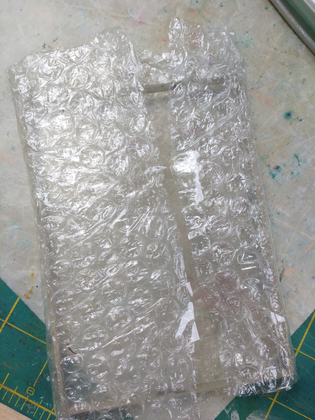
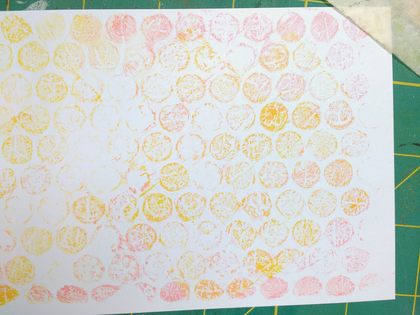
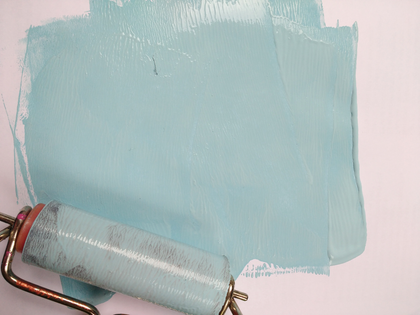
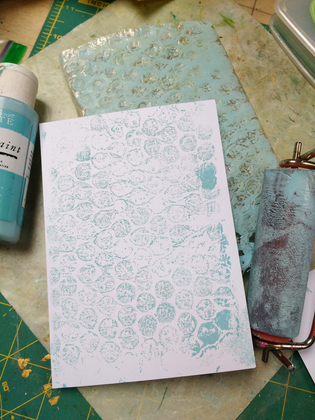
* If you have an old wheel, it's very easy to stick a strip of bubble wrap on it; wheel it over your inkpad and then onto your paper. No wheel - tape some bubble wrap around a block, ink it and stamp with it.
Inked with fossilized amber and worn lipstick distress oxide inks:
* If you want to use paint, I found the best way was to put a small amount of paint on scratch paper or a palette, and then use a brayer to apply it to the bubble wrap. I tried inking it by pressing it into the paint on the scratch paper, but didn't get a good print - for me, I achieved a better result by brayering the paint onto the bubble wrap. For this, again I stuck the wrap around a block, as in the photo with the distress oxides.
Whatever way you go - have fun! Then come back and share your card with us all here.
:arrow: Remember to use the keyword TLC648 when you are uploading. It's helpful (to the hostesses for sure!) if you come back and leave a link on this thread .
If you're not sure how to link your card on the thread here, here's how:
1. Open 2 windows or tabs: one window for your card and one for this thread.
2. In this thread, click on reply and type anything you want to show before the link.
3. Go to your card window. Highlight the address for your card. (It says www. splitcoaststampers.com/gallery/showphoto..... and so on)
4. Click EDIT. Click COPY
5. Go back to this thread. Click PASTE.
Sabrina,This was a fun challenge. I had to rip open a bubble wrap envelope to play. I can't believe I didn't have any other bubble wrap. LOL Here's my card.
__________________ My Blog- Trusting in the Lord for Everything Proverbs 3:5-6 Trust in the Lord with all your heart and lean not on your own understanding. In all your ways acknowledge Him and He will make your path straight. My Stampin' Up WebsiteMy Gallery, BRAK New Member Mentor. New Grandmother to Mia Lou. 1st Grandchild.
Yes, I was going to come back and suggest that if people thought they didn't have any, they might have a bubble wrap mailer. If I'm not keeping them to reuse, I normally at least pull the bubble wrap out.
Quote:
Originally Posted by bensarmom
Sabrina,This was a fun challenge. I had to rip open a bubble wrap envelope to play. I can't believe I didn't have any other bubble wrap. LOL Here's my card.
If I had had time to did through my stash, I'm sure I still have bubbles wrap bg's that I made 30 years ago . . . . but I started from scratch withthe inside of a padded envelope.
What a fun challenge today, Sabrina! I have our 10-year-old grandson with us today and we had a blast making backgrounds together, both with inks and Brusho paints. Here's the first card made with the stamped background, made by using your idea of wrapping the bubble wrap around a wheel.
Thank you Sabrina for the great challenge today! I used my bubble wrap just a little bit differently. I wrapped it around my finger and pressed down a little harder to get more of a Bokeh effect. I used my own photograph as my layout inspiration.
This looks like so much fun! But alas, I have no inks or bubble wrap with me. Maybe I can play by the end of the week! I'll be watching to see what all of you make though!
__________________ Proud Fan Club Member
Dirty Dozen Alumni
"Art washes away from the soul the dust of everyday life."
Love using bubble wrap for cool backgrounds. I've also used a brayer to apply acrylic paint to a gelli plate then pressed bubble wrap into it and stamped with it that way. Plus you get the negative imprint when you put paper on the gelli plate.
Sabrina, thanks for the bubble wrap challenge, which I've not tried before. Being a little apprehensive, I only used the bubble wrap on two corners. Next time, I'll do better! Here is my card.
Such fun...I was only doing this technique with our grandies last weekend after watching a recent video on the technique. Love the cool effect it gives. Thank you for sharing. Happy day
__________________ The Difference Between Try and Triumph Is Just A Little Ump Wednesday: Alpha Challenge
Thursday: Ways To Use It Challenge
Monthly: MMJ Challenge….get inky and have fun