Splitcoaststampers.com - the world's #1 papercrafting community
You're currently viewing Splitcoaststampers as a GUEST. We pride ourselves on being great hosts, but guests have limited access to some of our incredible artwork, our lively forums and other super cool features of the site! You can join our incredible papercrafting community at NO COST. So what are you waiting for?
***edited July 2017: as Photobucket no longer support third party hosting, I have added the photo tutorial both as an image in the write-up and as an attachment. If you open the attachment in a new tab, you should be able to enlarge it to a good size.
Ding dong, ding dong - before I proceed with my challenge post I have a public service announcement to make.
As you know - sometimes there are 5 Mondays in the month; so we have a new hostess joining our ranks who will cover those extra Mondays, and I am sure will bring us some fun challenges!!
Since we have 5 Mondays in June... WATCH THIS SPACE!!!
And now, back to today's challenge...
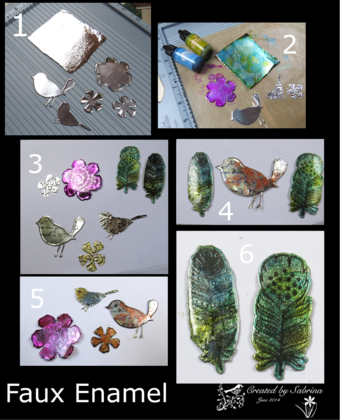
Faux Enamel / Heat embossing on metal
I was playing around with an embellishment for a card recently, using heat-embossing with heavy foil, and it reminded me so much of enamelling that I have called it Faux Enamel. Enamelling was one of the many things my dad tried out over the years, and I still have some of the pieces he made., including a lovely little Moomintroll saucer; and he made my mother a lovely pendant based on a Max Ernst drawing.
I thought that we could try this for the TLC this week!
You can use several different supplies for this - I'm attaching samples with various combinations.
Mostly I use the heavy foil roasting-tins/pie dishes when I need good strong foil for die-cutting.
Pop/soda cans will work well too - I didn't have one around to try for this since we don't drink any, but I've successfully die-cut them before with Bigz dies. Just take care not to cut yourself on an edge if you try this!
If you don't have either of these - I made a couple of samples by sticking regular kitchen foil to a piece of cereal box, and die-cutting that. That worked perfectly well.
1: Diecut your chosen shape.
2: If you wish to dry-emboss it for texture, do this step now - the smaller bird and flower, in my examples.
OR
You can stamp on it at this stage, like my larger bird.
3: Add colour!
In my samples, the stamped feathers and the big pink flower were coloured with alcohol inks; Sharpies or Copics will work perfectly too.
You can use rub-on colour like Inka Gold or Treasure Wax. In theory, there's nothing to stop you using paint if you wish - experiment away!!
If you need to add more stamping - this is when to do it. My big pink flower and the feathers were stamped at this stage.
4: This is the heat-embossing stage.
If you've used heavy foil or pop cans, you don't even need Versamark. Once you pre-heat your diecut piece with your heat gun, you can just sprinkle embossing powder over it/ dip it into your container without any ink. I use a crocodile clip on a wooden handle (from my box of chalks) for holding it ;-).
However, if you've used regular kitchen foil over card, I think you should probably use Versmark - that's what I did. It won't get as hot as the metal on its own does.
(For my stamped feathers, I coloured the foil with alcohol inks, then stamped with Versafine because I couldn't get a good image with my rather old StazOn ;). That meant I had to emboss straight away with clear EP so that the stamping didn't smudge, and after that I used Versamark to coat the whole feather and continued to build up layers of embossing powder).
Build up about three layers of either regular clear EP or UTEE. Then if you wish you can sprinkle some Perfect Pearls over the top layer and melt them in - or glitter.
5: If you wish to add definition to the edges, or details like the eyes on the birds, do this now. I used a Sharpie for the flower edges, and black Enamel Accents for the eyes.
I also made a feather using just coloured embossing powders. You can see that on my sample.
I hope you'll have fun trying this out. When you've made your faux enamel piece, or tried heat embossing on foil, and made a card incorporating it, be sure to come back and share the link to your upload here!
If you're not sure how to link your card on the thread here, here's how .
1. Open 2 windows or tabs: one window for your card and one for this thread.
2. In this thread, click on reply and type anything you want to show before the link.
3. Go to your card window. Highlight the address for your card. (It says www. splitcoaststampers.com/gallery/showphoto..... and so on)
4. Click EDIT. Click COPY
5. Go back to this thread. Click PASTE.
I hope you have fun with this!
I'm in work this morning but I'm subbed to the thread and should be able to pick up and respond to any queries if you have them .
Sabrina, the samples are gorgeous and you did a brilliant job of explaining! I really want to try this; hopefully I'll have some time on Wednesday...
__________________ JodyLynn - "Love me - love my cats!" DTGD12, DTGD14, HYCCT12, HYCCT13, HYCCT14, HYCCT15, Love Fest 2013, Love Fest 2014 CAS and CC guest designer QFTD 258
Great samples and great technique. A year ago, my puppy dog chewed through the cord of my heat gun. (Thankfully it was unplugged when he did this.) My husband had it fixed, but the fix was coming undone so I can't use it until he fixes it again. so bummer. I guess I'm out of this challenge just watching from afar.
Question: Do you think that putting the UTEE on the foil and putting it in the oven would work?
I've never had to try, MariLynn - but I don't see why not.Rather than fumes in the oven, though - I was trying to make a heated crayon background without a craft iron, and I just lined a skillet with aluminum foil and heated it on the stove at a low heat, and scribbled my crayons onto that. I was surprised how warm the mountboard got, and I'd expect (no guarantees, though) that it would be enough to melt UTEE since metal would be a lot more conductive of heat than mountboard!!
When I started reading about this technique, I thought it was going to be difficult. So wrong! Easy and fun. Since I had my alcohol inks out, I decided to used them to create a panel for my card. The link to the technique is in the photo details. I imagine the same technique could be used with water colors, but what I like about the alcohol ink is it dries almost instantly. Here is my Faux Enamel Butterfly
__________________ Priscilla (aka - PJ)
QFTD187 My Gallery
Thanks for the cool challenge! I kept it simple- luckily my new heat gun isn't noisy so it didn't scare my little black bunny nearby I used a nice sentiment stamp from Hampton Arts, and a tie die dp border from my stamping buddies. Finished with a turquoise border, and 2 mini metallic dies to anchor my panel. Here's Sending Blessings
__________________ "You can't use up creativity. The more you use the more you have." -- Maya Angelou
Sabrina- just had to revisit your challenge- this time, I used a memory box spool die and a green sharpie for my metallic element- and paired it with TPC Studios' Sewing stamp set. Added some "thread" and fabric- that machine is humming away! Here's I Love Sewing
__________________ "You can't use up creativity. The more you use the more you have." -- Maya Angelou
__________________ JodyLynn - "Love me - love my cats!" DTGD12, DTGD14, HYCCT12, HYCCT13, HYCCT14, HYCCT15, Love Fest 2013, Love Fest 2014 CAS and CC guest designer QFTD 258